Pages

Friday 29 April 2011

Weirdboy Battle Tower 13


Second pintle Big Shoota is sorted and both have had the GS welds done. Unfortunately I don't appear to have any Ork Boyz to convert into gunners, so I am now waiting for the sprue I ordered off ebay to arrive for those.


The second Big Shoota is lower in relation to the walkway height, but I still think it'll need a firing step. But untill I get the Boyz for gunners I won't be able to do them.

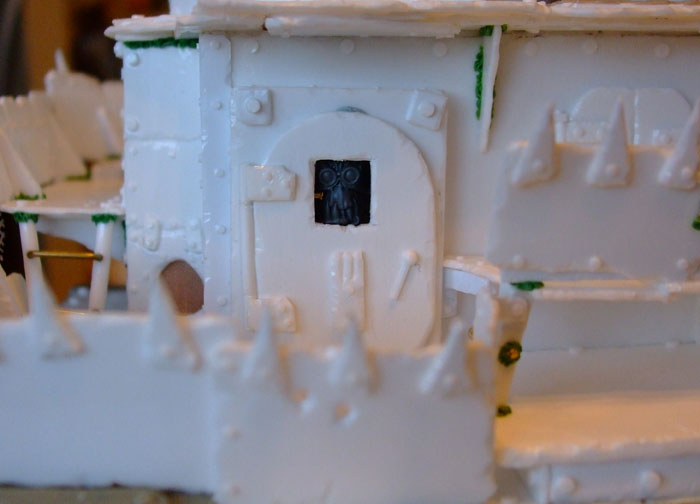
Now, you may remember I have been stuck for sometime with what to do with this empty box like area;


Well I finally had a spark of inspiration...

Converted a grot and a squig from a Grot box, I have named the squig Squiggles.


The box area had some work done on it, namely on the inside but I also had to redo the rivets on the outside - originally thought was that you wouldn't see the inside so it didn't matter if the rivets didn't line up with anything. I also had to add another piece to the roof at the front.


I then knocked up a gate:


And when you put them all together you get a Squig Pen...

Many a grot has been lost over the edge and impaled
on the walkway spikes when releasing Squiggles.


Squiggles is used to hunt down any Weirdboyz that may get loose, as well as to keep some of the Madboyz away (he is generally unsuccesful in this).

Thursday 28 April 2011

Dambustas 40k 3

Well.

The boards have been repainted and had a couple of coats of lacquer.

I took the colour I wanted into the DIY store and they mixed up a pot of paint to match it, or at least they did in theory. It hasn't quite turned out like that. To begin with the paint was basically a brown, I hoped when it dried it would change colour to the dark green with a mild blue tint to it. In fairness it did, but so dark that the boards are almost black.

I'm not painting these again, probably. I may in the future get another paint mixed up, this time one that dries so you can actually see the green in it more.

Bit of a bitch to photograph as they are so reflective. Out of the sunlight they appear too dark, in the light you just get a lot of white.

Best I could do...


Bommer not painted by me...
So a mixed success overall. The boards look better, thanks to the repair work and getting rid of the horrible blue. But the new colour is far from perfect. I can see me redoing them again at a later date.

Wednesday 27 April 2011

Weirdboy Battle Tower 12

Spent most of the day model wise adding lacquer to the Dambustas boards. Hopefully tomorrow I will be able to get some pics of them and do an update.

In addition to that I had another round of adding detail to the tower. Did some work towards getting crew on there and also started building the pintle Big Shootas.

First up we have the guy peeking out through the door. The head is a stand in - the plan is still to use some sculpted Madboy heads on a number of the crew figures.


Round the corner I used a boy torso attached to some cut down legs to sit in the hole left in the paneling. I used some brass rod to allow him to be easily removed but sit securely when in place. Arms & (madboy?) head to be sorted. The hinge was changed on the hatch door so that the central piece is now glued to the panel on the tank, rather than the door, just for ease of positioning - it will now open to the side rather at the rear so the detail on the wall isn't covered up. Also added a handle (not shown in pic). The grot is a temporary stand in - I will use the arm but on a different body, idea being the Madboy is popping out of the hatch and the Grot is going to twat him.


Most of the work on the first Big Shoota is done, will need to add weld lines on the cross piece and the pintle base.  Big Shoota needs a bit of work as well, GS mainly to repair the casting. Due to the height of the walls and the spikes I added I will need to put in a firing step - area in red in the pics. Sure i'll have to do the same for the second one on the other side.


Tuesday 26 April 2011

Weirdboy Battle Tower 11

Bits and pieces added today.

Glyphs - 'Garg Wurr' and at rear 'Gutz'

Glyphs - 'Zog Madboyz'
Glyphs - 'Gor' and on the door 'Thug'

Spikes have been added along the walkway & a number of glyphs added. Still more glyphs to add and a load of dags.

Translations...
Garg Wurr - Big/Terrifying, Weird
Gutz - Engine
Zog Madboyz - Stay Away, Madboyz! or Stay Away Madboyz! can be read either way.
Gor - Slaughter
Thug - Minderz (as in 'Minderz Only')


I started looking at the top structure, where the Weirdboyz will be based.

'tis quite tall.

From above...two forward 'cells', each one for a weirdboy. At the rear is the Minderz room.


Minderz room -
A - door to the tower,
B - doors to the weirdboy rooms.
Idea being that the weirdboyz can't get out without going past the Minderz.

The plan will change a bit, probably the weirdboy cells getting slightly bigger to the side, with the minderz room growing out the back a bit and changing shape slightly. The mockup is just to get an area of overall size and height.


Roof angled up to the central tower, the internal wall will be angled the same. Above the central tower I am thinking of adding something. Possibly a Grot lookout.

Monday 25 April 2011

Weirdboy Battle Tower 10

The walkway is pretty much done...


Close up shots:


Technically it isn't finished in all honesty, I will be adding glyphs and a shed load of dags etc to the panels. Hopefully I will also be able to add a couple of pintle Big Shootas along the walkway, but only if I can fit them on without it looking crap.

Weirdboy Battle Tower 9

Two posts in one day...can this be real?

On the rear of the tank I added a panel of styrene as the surface of the resin was crap. The FW exhausts were added again with a few Orky dags. I used a spare chimera panel to replace the old one that was removed. I carved in a few bullet holes where the Orks had taken some pot shots at the IG icon before the Meks could stop them.


You can see in the pic I cut a circle out of the styrene so that the curcular gubbinz on the back of the tank could poke through.


In the pic above you can see where I added a bit of tube where the fuel line goes into the engine area, it was pretty rough down there and there was actually a gap between the pipe and the vertical panel, the cast and kit wasn't the best to be honest. I also got rid of the circular locating peg thing and GS the area. The peg is no longer needed as it was only to locate the original Stormsword superstructure.

Bit undecided what to do underneath the engine block:


It is pretty rough around the join and generally looks a bit naff. On the one hand it is underneath the tank and will probably never be seen by anyone, on the other I will know it is there and could look better. Will have to have a think about it.

Sunday 24 April 2011

Dambustas 40k 2

Progress has been made, i'm not saying by much, just saying it has been made.

I gave the boards some attention, sanding a few areas which were a bit rough then using a bit of wood filler in a few gouges. This got a bit of sanding with some wet & dry then the whole lot got a quick clean ready for painting.

The plan was then to go up to the DIY store to buy some paint, however, it turned out they were all closed due to it being Easter Sunday.

So instead I had a play with the aim of deciding what colour to actually make the boards.

This involved mixing up different colours then painting some pieces of card. Once the paint was dry I used some gloss varnish to cover half of each sample. I could then use a bit of the Dambustas terrain to see what the effect was. In the end I picked one which I liked the most, a dark green with a (very small) tint of blue.

I will now take the piece of card, without the varnish on, to the DIY store so they can mix a small pot up for me.


NB: The colours in the pic aren't completely accurate. As such i'm not sure off hand which of the above is the one I picked.

Once the boards are painted I'll give it a good coat or two of gloss varnish. This time I will use a spray varnish to avoid any brush strokes showing up.

Saturday 23 April 2011

Weirdboy Battle Tower 8

Somewhat thin update again, been too distracted by 'real life' to get much more than this done.


As you can see in the pic the front area is done now. Area got plated, drivers viewport/access hatch is done and a vision slit added on the right side.

Close ups:


Drivers viewport could be better...

I think next up will be the rea, getting the original (now cleaned up) exhausts in place.

Unless that is I decide what to do with this area:


Seemed a good idea at the time...
May just go with a pair of doors, with a grot coming out of it. Or perhaps put a big window in with a Madboy behind it looking out.

After i have eaten some tea I'll be getting the sandpaper out to attack the Dambustas board. Not decided on a colour yet to paint them.

Friday 22 April 2011

Poisoned Chalice - 2

I admit this probably won't go down as the most exciting of posts...

The Poisoned Chalice board has gone under the knife and had a small cosmetic procedure.

All the spots of damage were filled with some filler, in some cases it meant actually making the hole a bit bigger so that the filler would stay in better. The one corner which was most damaged had some finn board fixed in place.


They got a bit of a sanding then a spray of black (after masking round them). The bit of brown is a different filler, while sanding some of the filler fell out (hadn't fully dried).

I then went round to paint the repaired areas and any areas where the paint had got chipped (or rocks had got knocked off). Thankfully the new areas of paint seem to match the exisitng good enough.


I then made some strips to go around the piece from Finn board, the corners where reinforced with some plastic strips i've had knocking around for ages.


Hopefully that will ensure the panel suffers no more damage while it sits in the garage. I wrapped the cliff in bubble wrap and then covered it all in a couple of plastic bags to give it a bit more protection and keep the dust off.

While I had this on the workbench I also got the second piece out and touched up the paint on that. No damage to repair thankfully, just a bit of chipped paint.


That's one more job ticked off the to do list.

Next up a bit of work on the Weirdboy Tower tonight, then onto the Dambustas repaint.