Pages

Monday 30 April 2012

Scatter Terrain - 5 - Generator

Continuing the search for more pieces to get printed I decided to do a 'Generator'. Ideal for Zone Mortalis as well as being useful for regular games.

The idea came about as I was looking through some old pictures of terrain I did back in early 2006. I made some small city fight ruins as test pieces for larger ruins. The idea was for these small buildings to be part of a set linked together with pipe work. In one building I used some pieces from old inhalers to form a 'generator' unit.


One day I will have the time and space for doing Cityfight terrain...
...one day...

As you can see they were pretty rough and basic. Frankly they look even worse than I remember.

But as an idea I still liked it. I wanted to do the same, but better. Individial units that can be lined up or used individually. I was also happy with the size of them, small enough to go in ZM rooms but not so small that units of them will be lost on a regular gaming board.

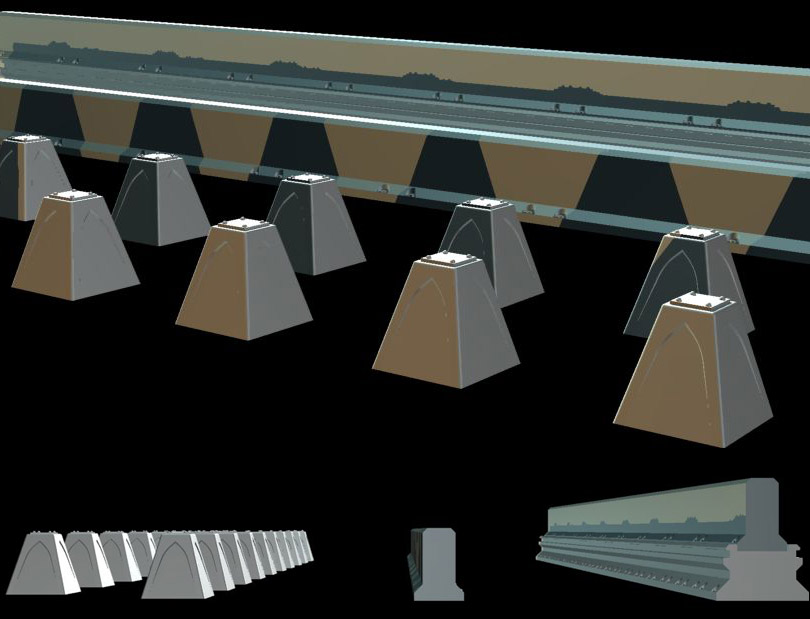
So today I started work on the 3D model...


Lined up as a group:


To give an idea of their size here are some Barry shots. For Barry I did a quick model, the base is the size of a GW model base while the horizontal line is 28mm up from the base, so in theory approximately in line with a GW models eyeline.


I also did very quick and basic ZM layout to show them set up in a large room (in hindsight probably larger than we would have in ZM). You can see they will be big enough to block movement and give cover but they won't be so big to be a problem in rooms.


In principle I am happy with the design. But I do want to improve the side detail as it isn't quite right yet. I am considering doing a seperate end piece which would incorporate a control panel. Each unit (whether it be a single unit or a row of them) can have one added to it.


Detail oon the side i'm not quite happy with.
So providing the cost isn't too high and I am happy with the side detail once I have re-done it this is one more thing which will be on the shopping list to get printed. I am still on the look out for more items to get done.

But before I start any new 3D models I will finish both this one and the bunker/bastion door.

Sunday 29 April 2012

Grot Tanks 3.1

To be honest i've not done enough to really warrant an update, but I said i'd do one tonight so I thought what the hell.

Started adding a bit more colour in some detail on the turrets, ends of the grotzookas, check pattern on a couple of turrets plus the dags on the command tank turret.


Also started on the two crewgrots.

This is the first one, he is very, very rough. Decided to give him a red beret and bloo trousers. However he will be in the bloo tank so I may change the trousers. Will wait till I see what he looks like in place before deciding.

Be gentle, he is very much a work in progress...
Not sure what tomorrows update will be, prob won't be on the tanks though.

Friday 27 April 2012

Bunker Doors 1 - Concept Work.


Sometime soon I will be putting in an order for some more 3D prints – mainly the stores pieces (drums, crates & pallets) but at the same time I want to try and get as many other pieces done. This will save on postage costs which over the previous orders soon mounted up.

In addition to the Dragons Teeth previously shown I am looking at doing a bunker door. The first place for this will be on my GW Bastions as I’m not keen on the look of the one which comes in the kit. I also want to be able to use the same door in other places, such as on bunkers, tunnel entrances etc.

So here are the early concept designs. Keep in mind these are CONCEPTS only, they are not finished designs or close to being fully detailed. Once I narrow the options down to one or two I can then finish them off.

The door and frame will be separate pieces, allowing the door to be left off if desired or for the door to be used on its own.

Frame Concepts:


The shape matches that of the Bastion piece as it will obviously need to fill the same space.

Final details would likely include lights, plaque, keypad and so on. However I want the look to be simpler and less cluttered than the GW design. I find much of the GW terrain to be over the top, I prefer the terrain to be more functional and straight forward (like my defensive walls) but with enough detail to be interesting.

Door:


Similarly the door has a simple, but hopefully interesting look. The sensor/speaker unit is there to give an idea of the final design, I hope the final design will look better. I will also look at finding the best position for it – at the moment it is just stuck on.

A few shots of the door in the Frame A and E.


Frame A was the original design the others are best off hence having more pictures of it to hand.


I did an assembly of Frame E as due to its design being different to the others I wanted to show how it looks with a door in place. I quite like how the sloped front creates the step in front of the door, the small alcove would contain the keypad to gain entry.

Anyone got any thoughts on the options for the frame design? Or come to think of it any more ideas for things I can design and get printed.

Thursday 26 April 2012

Grot Tanks 3

Time for some more tank based Grot action.

Now, you may remember from the last update the first tank was white. Well these two are blue and red. You may be thinking 'but why Rictus? Why have you gone for this scheme?'. Well to answer your hypothetical question the answer is The Italian Job.

While pondering many of the wonders of life I suddenly thought 'The Italian Job. I could recreate the three minis and a tribute to the film'.

By the film I am of course refering to the original 1969 film, not the walking abortion which known by the same name from a few years ago.

So first up here is the bloo tank.


And the Kommand Tank, which is naturally the red one. Michael Caine would be proud.


Still alot to do on all three of them.

But to be getting on with here is a group shot:


Recalcitrant Daze - A brief hello.

Hello.

I know things have been a bit quiet of late, I have been a bit busy, not to mention a bit under the weather on and off which has resulted in not much getting done at all.

Over the next week things should progress only to then slow down again as I am away for the first two weekends in May, as such my time will be limited model wise.

I hope by then I shall have all three Grot Tanks finished. Expect updates on those every couple of days most likely.

No doubt I will end up doing the odd non-grot thing at the same time, for example I may do a bit of casting as my defensive walls have not had any attention for some time and they are in serious need of some mounting plates.

I have had word from Shapeways regarding the two dodgy looking prints for the gun emplacement and they are going to be reprinted (hurrah), I hope to have them in a week or so and after casting I’ll finally be able to see if either a. they all fit together to form a gun emplacement or b. i've wasted time and money for bugger all. In the meantime I need to sort the gun mounting plate out.

In other news I noticed yesterday two milestones for RD…

  1. RD has gone past 200 posts (this post is in fact the 202nd).
  2. RD has passed 60,000 views. This is quite a lot.

Following on the heels of RD’s 1st postday (seems a better term than birthday) the above slipped by under the radar.

The grot tanks will have to celebrate these two facts as well as I haven’t got time (or the inclination) to do something else as well.

Though I do have that Chaos Warhound sitting in a box…

…not to mention the Marauder Destroyer sitting in another one.

Time, you are a slippery mistress.

Tuesday 24 April 2012

Grot Tanks 2

Well things have been a bit quiet model wise but tonight I finally did some more work on the first of the Grot Tanks.

My airbrush appears to be knackered so things are going slowly.

Very WIP I should mention, with a lot of weathering and detailing to do.


Wednesday 18 April 2012

Scatter Terrain - 4

Just a quick update tonight on the 3D models for both the Dragons Teeth and the Pallets.

I've got nothing else done for a couple of days (due to either having a headache or I couldn't be arsed to do anything) so this update will just consist of rendered images from my computer.

First up Dragons Teeth.

I modified the model by raising the skull till it was centred on the arch top.


The revised model on the left, the original version on the right.
My preference is the new version. In comparison I find the skull looks odd 'floating' in the middle of nowhere on the original version. I think the design is now pretty much set, I don't think I will be modifying it or adding anything else to it.

Second up are the Pallets

I felt the tops were still lacking and rather plain. I increased the number of holes to start and then added a treadplate pattern. The treadplate gives them a much better texture and will look far more interesting, especially those which won't have stores on them.

The top plate for the larger pallet.

Large pallet assembled.

Top plate for the smaller pallet.

And the assembled smaller pallet.


Realised I hadn't really shown the two pallets together, so here are a couple of shots showing how they compare in size.


Hopefully my next update will be on the Grot Tanks. While I haven't done much for two days I did get them undercoated so I should be starting the actual painting process soon.

Monday 16 April 2012

Scatter Terrain 3 - More Tarps & 3D Concepts

This evening I continued experimenting with the tarps...

I applied the sealant/water mix as before but managed to thin the 3-ply tissues out, removing one layer for the one tarp and two layers for the other one.

I also tried painting the stowage and the tarp seperately. This was definately easier so i'll be continuing with that. The tarp was washed once glued into position as you can get into all the folds etc.

This version is 2 ply:


While this one is 1 ply:


Having less sheets definately makes it easier to handle and get into shape.

However the one did tear so you need to be more careful when handling.

I am going to continue playing around, trying out different ratios between water and sealant and trying different ways to paint them. Expect more updates on these in the coming days or weeks.

3D Modelling Concepts...

I returned to the pallet and added the skull hole


I looked at an alternative version, where the skull is depressed into the plate with eye and nose holes going through...while I like the look of it it is just too small I think to work.


I looked at doing some Dragon's Teeth as well. I did some a while ago but they were pretty rough and so I thought I would get some new ones.

My original teef.
The skull on the pallets above where originally done for the new Dragons Teeth:

And the WIP 3D model of the new vertion
And a quick shot of the Teeth set up in front of the defensive walls...


More to come...