Wednesday, 31 August 2011
Da Choppa 4
Paint being applied two nights in a row? Surely a sign of an impending apocalyse or psychological breakdown of some kind.
Rokkits are basically done now. Again I will add some migs/oils at the end.
I was asked to include some checks, so I did. The one has some black/white ones while a second one had some white/green ones. I have never seen Orks (or Grots) would be the kind of 'person' who takes that much care or time when it comes to painting, hence the very rough, carefree squares etc.
In their launchin' holes:
Will have to remove a bit of paint buildup on the rokkits and on the inside of the launch rubes so that they fit nicely and be easily removeable.
Can I make it three nights in a row? Almost certainly not.
Tuesday, 30 August 2011
Da Choppa 3

Who said I hate painting?
Well other than myself.
And everyone I have ever met or spoken to.
Anyway...I've started adding more paint.
Not a huge amount though, so far the barrels are done and the banner pole. However none of them are finished as some mig rust & oils will be added - but I will do that at the end for everything, so for now these are done.
 |
| One Green Barrel |
 |
| Two Yellow Barrels |
 |
| Banner Top - White on the 'cog' doesn't show so well in the pic. |
Monday, 29 August 2011
Propaganda and Information Posters
I originally did these posters way back in 2006 and posted them on Warseer including a pdf sheet so people could use them for their own use; as such they may seem oddly familiar to one or two people.
The posters are split into two categories – propaganda and information, though the lines are a bit blurry between the two. Propaganda posters are directed towards influencing a group’s attitude, while the information posters are more direct by simply passing on information.
Propaganda Posters:
All of these posters are based on World War One or Two propaganda posters. Just like the original posters these are all aimed at encouraging people to support the war effort in one way or the other.
I simply took the original image and manipulated it into something more appropriate for the worlds of the Imperium. For example here is the famous Kitchener poster and the modified 40k version…
A quick change of text, an Imperial Aquilla and a Guard winged skull on his hat brings the poster from the streets of World War One Britain and into the 41st Millenium.
Another before and after example, this time using ‘The Enemy is Listening’ poster, this time from the US circa World War Two. Again just some Imperial imagery is enough to allow the poster to fit in nicely on an Imperial world.
Information Posters:
These are the simplest of all to produce as they can be created with just text and a few icons.
I created a template allowing several variations on the theme to be produced. The proclamation posters use song lyrics as the text (songs by The Wildhearts infact). I found copying actual text from something was a lot easier than trying to make something up, even with the text being unreadable at the size it is being used it just looks more natural.
The posters are designed to be printed out at 35mm in height, small enough to fit in yet large enough to make out enough detail. Back when I did these they matched in height some posters GW had produced, allowing me to mix them in if I wanted.
Once printed out the posters have to be screwed up before being flattened back out and glued to a building, they can then be weathered in to match as required. For ruins you can weather and add plenty of damage while still getting a good effect.
I tested the posters out on a simple ruin I built as a test piece for some Cities of Death (or Cityfight back then) terrain.
EDIT...
Hopefully this works. I knocked up a quick sheet of the posters laid out on an A4 sheet. If you print this out at 100% the posters should be 35mm high...
Sunday, 28 August 2011
Da Choppa 2
Truly hate it.
Da Choppa is progressing 'painfully' (see later). I have pretty much done the base colours now. I picked up a spray paint which is pretty close to Boltgun Metal and used that on all of the Orky areas. I have the Imperial parts a coat of Tausept Ochre. Imperial ID stripes were also added and the treadplate pieces picked out in Tinbitz for some variety.
Now I know the basecoats are a bit rough but 95% of these basecoats will be hidden under the camo so i'm not too concerned,
And as usual every project demands a price in blood.
Bugger to type now.
Wednesday, 24 August 2011
Recalcitrant Daze - Slight Change of Direction
Now anyone who has seen the last few posts will know the War Altar was going to be my Golden Demon entry this year, driving home from work this evening I had a realisation that the War Altar just won't be ready in time.
It is four weeks till Games Day and I reckon I have at least two weeks worth of building left to do so that leaves me with two weeks to paint it. That sounds ok except for one thing, namely the last job I will hav eto do on the vehicle is add water effects to the digestion pool. Frankly the amount of time the water effects are taking on the Realm of Battle pools there is no way I have enough time to fill the digestion pool which is twice as deep as the RoB pools.
So rather than trying to rush things or compromise the build I have decided to do something else for a Golden Demon entry.
I still wanted something a bit on the big side so I have decided to paint up Da Choppa.
I have started prepping some of the pieces ready for undercoating tomorrow, but my first real job will be to pick a camo scheme. My plan for my Ork vehicles is that they are all looted Imperial tanks and each tank Kommanda paints it up in what he thinks is the best camo scheme.
I am open to any suggestions that people may have for good camo schemes that I can bastardise for an Ork equivalent.
For thos who may not remember/of seen before Da Choppa here is a quick reminder:
If you have seen any interesting camo schemes please do give me a heads up. More pics of Da Choppa can be found in an earlier blog post - just click on the 'Da Choppa' tag.
Monday, 22 August 2011
War Altar of Nurgle 11
A bit more progress has been made.
The rear platforms are now in place, bolt heads added and some GS/sugar added.
Under the pustules on the one platform I also added some GS:
At the front the angles plates where the lights go I finally started to do something. Been uncertain till now about what to do there but decided to jump in and do something.
And on the other side, not so happy with this but there is plenty left to do before i decide if I redo it or not.
Saturday, 20 August 2011
War Altar of Nurgle 10
Been busy. Hence no updates. Till now that is. Short sentences is the way. Probably.
Anyway, enough crap.
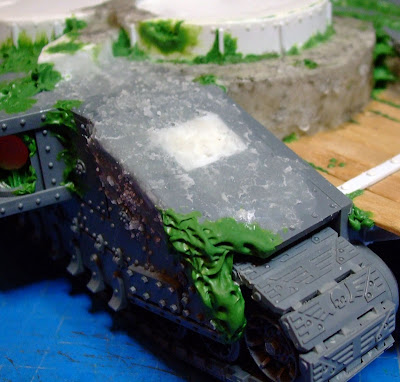
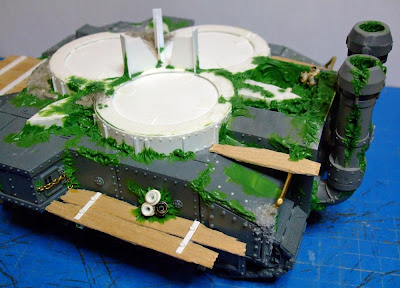
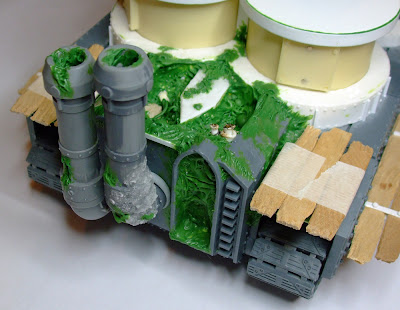
Rear and side of the War Altar has progressed. Most notable the exhausts are glued in place and I have started putting together the platforms each side of the engine block/sacrificial pool. Plenty of GS and other texturing has been done on the top and around the sponsons.
Added a bit of chain to keep the hatch shut (the other side already had some). Started added some interesting detail to the side platforms as well.
Pic showing some of the top texturing.
Quick pic showing the two rear platforms in place, the inner ones (with the GS on) are fixed in place, the others are just resting there for the pic
Monday, 15 August 2011
War Altar of Nurgle 9
During the gaps between packing the bits sold on eBay a bit more progress has been made on the WAoN.
At the rear some plastic was removed to allow more GS to be added around the 'flesh pit'. The plates which the fuel drums normally go had all the detail removed so they were flat, with the holes filled with styrene and GS. Replacement rivets will be added shortly. GS was added to either side of the engine block/flesh pit and onto these side plates.
GS was added in a few other areas (mainly as I had some left after each period of work on the rear), such as the join between the front of the sponsons and the side of the hull, as well as a few spots on top of the tank.
Now some shots with bits blu-tac'd in place. On each side of the flesh pit I had the idea of doing some more planking, where the slaves can push the 'supplicants' into the pit.
Meanwhile a bit more work was done on the exhausts. I am thinking of offsetting the height of them, just to make them a bit more interesting.
So much still left to do...
Saturday, 13 August 2011
War Altar of Nurgle 8
The War Altar has actually seen some work today...
To get back into it I have started working on the rear. Most of the detail has been removed and the shrine area has been completely carved out (was a bitch to do, should of dremeled it, but didn't). GS was then added and many of the gaps etc filled.
You can just make out I also removed the points where the fuel lines go in at the side of the engine block. Some styrene was added to continue the 'border' on the rear.
I have started on the two 'exhausts'. Based on some CoD pieces...
They are just blu-tac'd in place at the moment.
In the last picture above you can see the GS inside the exhausts. My thoughts was that the Daemon growth is inside the exhausts like cholesterol collecting in arteries.
In the shrine area the lower half goes further into the vehicle, this gives just enough room for a Nurgling...
At that point I started to put my fingers in the GS so decided to call it a day.
Hoping to get enough done tomorrow for another update.
To get back into it I have started working on the rear. Most of the detail has been removed and the shrine area has been completely carved out (was a bitch to do, should of dremeled it, but didn't). GS was then added and many of the gaps etc filled.
You can just make out I also removed the points where the fuel lines go in at the side of the engine block. Some styrene was added to continue the 'border' on the rear.
I have started on the two 'exhausts'. Based on some CoD pieces...
They are just blu-tac'd in place at the moment.
In the last picture above you can see the GS inside the exhausts. My thoughts was that the Daemon growth is inside the exhausts like cholesterol collecting in arteries.
In the shrine area the lower half goes further into the vehicle, this gives just enough room for a Nurgling...
 |
| I shall call him NikNak. |
At that point I started to put my fingers in the GS so decided to call it a day.
Hoping to get enough done tomorrow for another update.
Subscribe to:
Comments (Atom)


