
Nurgle Tank Tutorial
aka Converting Nurgle Tanks for Those Who Cannot Sculpt.
While I’ve never done a Nurgle army I have been unable to resist the lure of converting some vehicles for dedicated to the Plaguefather. It started with a Land Raider back in 2007 and since then I’ve found myself doing one every so often. I even pained a couple of them, which for me is a novelty.
There is one problem I faced when I came to start on doing some Nurgle dedicated tanks and walkers, namely when it comes to sculpting I have no ability whatsoever. Through various techniques I worked out as I went along this didn’t prove much of a hurdle after all.
While not a step by step guide the following lays out the various techniques and materials I have used on the Nurgle vehicles I have converted – and in a couple of cases still in the process of working on.
Surface Texture I
This was the first technique I employed . I was testing out some paint stripper on a second hand sentinel I had to see how useful it was and discovered that the stripper softened the plastic and gave it an interesting surface texture.
When working on the Nurgle tanks I found I could achieve two different surface textures depending on the conditions I left the model when it was covered in the stripper.

This is the more subtle finish, edges are smoothed out slightly and a rippling effect occurs, the softness of the plastic allows you to distort the plastic and you can easily push something sharp through it to create holes. To get the effect the model was simply left for a couple of nights with the stripper plastered all over it.

This is the more extreme finish. By leaving the model in a cold area overnight then bringing it into the warm and adding more stripper the rough surface texture was created.
In both cases care has to be taken to mask off any areas you don’t want effected, such as details (vents, hatches and so on) and weapons (you don’t want barrel droop…).
I used the texture achieved with the stripper as a base to then add more effects over the top.
Surface Texture II & III

A combination of super glue and sugar sprinkled on for a diseased skin like effect. The sugar was built up with small amounts sprinkled on, with a final coat of super glue brushed on afterwards to seal everything.

Showing the WIP sugar and how it looks once some paint and washes have been applied (still PIP however)

For a different looking rough diseased skin like appearance I used thin tissue paper (clean tissues preferably, though I suppose used would be more Nurgley) superglued to the model. Often adding some sugar to the top covering of superglue gives even more texture. The tricky thing is how to end the area covered, often blending fleshy areas into it will work best.
Surface Texture IV

Using a rotary power tool (a dremel in this case) a pitted look is easily achieved. I found simply letting the tool choose where to go gets a more ‘natural’ look. Lightly bringing the tool into contact with the model and letting it jump and skip. Naturally care has to be taken so not to damage either the model or yourself. Occasionally I add more force to vary the look and bring more variety to the texture created.
 |
| Again a PIP picture to show the texture once some paint and washes have been added. |
Flesh
As I mentioned I can’t sculpt, frankly I can barely fill gaps with Green Stuff let alone accomplish something more ambitious. However I use plenty of GS on my Nurgle vehicles to add areas of ‘flesh’, deamonic flesh growing or merging with the vehicle. I don’t think it counts as sculpting as I am simply adding GS and then pushing, pulling and poking it into shapes and forms that look pleasing and interesting.
 |
| The quick and simple way of adding flesh. |
Rather than simply covering a vehicle in GS I tend to use small areas or keep large areas uncovered. The aim is to add to the vehicle, not make it the filling in a GS bun.


The Dreadnought and Land Raider are examples where plenty of GS has been added but the shape of the base model is still clearly defined and much of the original pieces still show through. For vehicles which are not Deamonically Possessed I would add far less GS.
Another way to use the flesh is to cut into the model and fill with GS, this can be used to show that under the skin is the Daemon trying to get out or showing the vehicle ‘healing’ after damage.

Pustules and Growths
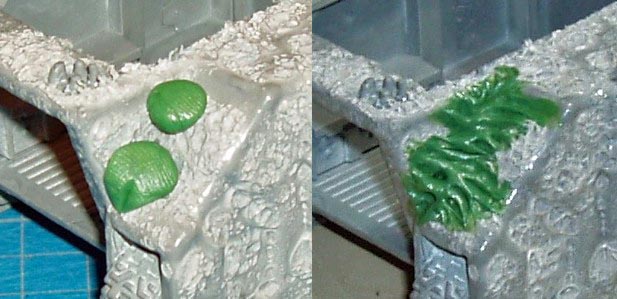
To break up the areas of flesh and to add interest I add ‘pustules’ and ‘growths’.

Pustules are a mix of GS balls, ball bearings and small balls taken from a water filter. The balls are pushed into the GS flesh, or arranged into groups as shown above.

‘Gunk...’

Can’t think of a better term than gunk for the mucus like discharge or pools. This is a mixture of two part epoxy and glue from a hot glue gun. While still hot it can be manipulated and drawn out.
On the possessed vindicator shown in the pictures I imagined that the vehicle was ‘fuelled’ by victims being thrown into the liquid at the rear while waste parts are then discharged out the rear…I mixed in a grasping hand into the fuelling pool and added some bones to the discharge.
To finish here is a picture of the Land Raider – the first Nurgle tank I finished...

And to show that the same techniques can be used on a smaller scale here we have one of my Daemonically Possessed Plague ships from Battle Fleet Gothic...

I hope that small foray into the diseased world of my Nurgle vehicles was interesting. To see more of the models featured above have a browse using the tags on the right. Please feel free to ask any questions and i'll do my best to answer them.
Excellent post! There are things in here I will definately use. Do you remember which stripper you used? Thanks!
ReplyDeleteCheers.
DeleteThe paint stripper it called 'Home Strip' for removing paint and varnish. Hope that helps.
That was an excellent post! Wow! So much to take in and try even though I do not play Nurgle. Thank you for sharing that!
ReplyDeleteThanks very much, glad you found it a good read.
Deletesome I have used some are new to me... I have heard of the "water filter beads" but when I tried it my beads dried out and became near microbeads... What brand are you using Rictus?? Im using an American brita filter.
ReplyDeleteErm, i'm afraid I have no idea. I bought it a while ago and emptied the contents out. As such I can't tell what filter it came from. I can remember I bought the cheapest I could find at the time.
Deleteno worries the bud... I may go on a buyinh rampage soon and try to figure it out myself!!! LMAO!!
DeleteVery cool effects! One of my favorite Nurgle-y secrets for slime/toxic pools is to first lay down a layer of elmer's glue, then immediately dribble on lines and drops of superglue into the white glue. The water in the white glue reacts with the superglue forming ropy, puckered areas.
ReplyDeleteGreat article - keep up the awesome work!
I've not tried that myself, I'll have to give it ago on the next Nurgley Project.
DeleteCheers.