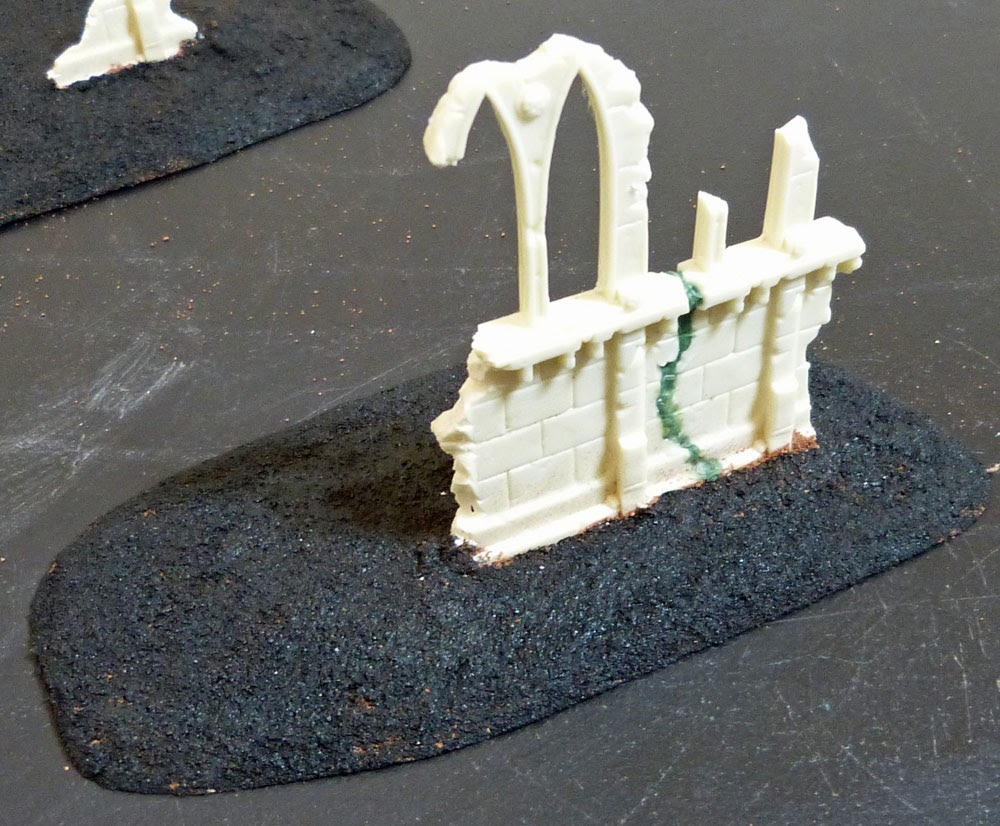
Not been able to get much done model wise of late but the ruins have progressed a bit.
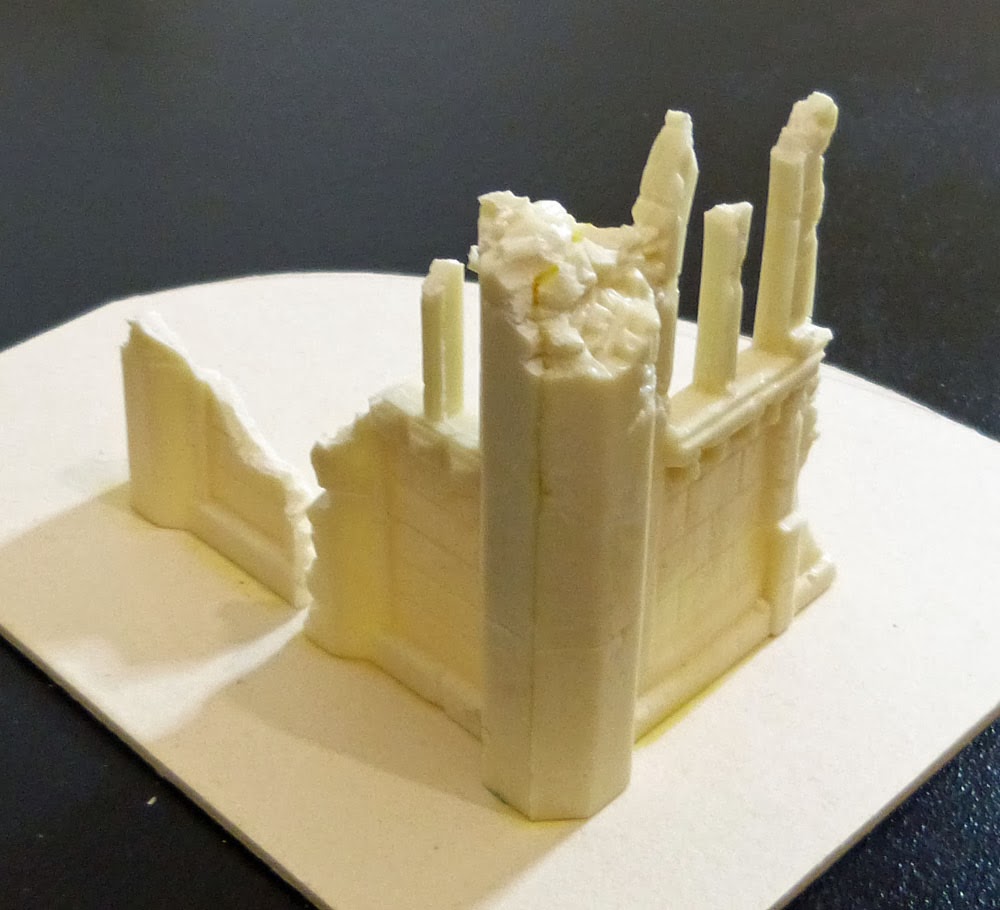
I added more rubble to the bases as well as add in some resin bits, basically bit of the ruins I had cut off.
I also attacked the walls with the dremel to add some more damage from small arms fire etc.
The insert above shows one of the resin off cuts I added in to the rubber. Not sure they worked as well as I hoped but oh well.
I am thinking of adding in some flooring to a few of the corner pieces including this one.
Managed to get them all undercoated today...
Even though I am going to (almost certainly) be adding some floors in I still wanted to get them undercoated at this point as it will be far easier to undercoat without the floors in.
Next up i'll look at adding some floors.
Sunday, 16 March 2014
Monday, 10 March 2014
Recalcitrant Daze - Stuff
It’s been a while since I have done a non-specific rambling
kind of post. For those who have been following RD for a while will remember
(with dread probably) the monthly post I used to do before I decided I didn’t
have enough to actually say to keep it going.
Not sure I have enough to say on this occasion either, but i’ve
started now so we might as well all just grin and bear it and hope it is over quickly
with as little bloodshed, tears and questioning our life decisions as possible.
So.
What is on the workbench at the moment?
Well we have the ruins getting done (tonight I did a bit of
dremmelling) and the Giant Spined Beast/Jabberslythe (currently working on the
base) plus of course the minor distraction of the wound counters.
Also on the edge needing attention are Deamons in the form
of Scabby, Blight Drone, Plague Drones, Nurglings and Plaguebearers to finish
off and the Robot Dreadball team to build and paint.
However on the horizon we have the new Imperial Guard Codex.
Sometime soon I want to get all of my Militia out for review, I do want to have
a slim down of them in preparation of a re-organising with the new codex. Will
I get anything new? Hard to say at the moment but if this is anything to go
by...
![]() |
| It's not Nagash level but it is still a tracked abortion of a vehicle. |
...I won’t be getting anything.
Forge World...
At the end of this month is the FW Open Day, I am happy to
say i’ll be there again. I’ve been to everyone so far and even with now having
to pay £8 to attend it is still great value.
Expect lots of pictures of FW hitting RD on the 30th
or the 1st of April.
And I couldn’t resist the Heresy Weekender again. Last year
was good but this year should be better, rather than just me wandering around
there will be three of us there combining the event with another meet up.
So naturally there will be plenty of pictures after that as well.
I am sure I was going to say more when I started this, but I've lost the will to carry on.
Wound / Hull Markers 1
Very quick update tonight.
For many years I have kept track of wounds (and now hull points) by using dice. However this tends to prove problematic at the best of times.
So I was looking to do some counters instead.
I picked up some skulls from Blood and Skull Industries. The plan was to use these as the markers with something on them to mark how many wounds or hull points were left.
This is idea 1 - inspired by old drawings showing Marines with studs to mark their long service:
So the studs mark the numbers of wounds/hull points left. I'm not sure though how well these stand out so I did a very quick paint job on one to see how well the studs show up...
Still undecided.
So I am going to do a second version with a roman numeral carved into the skull. I'll get that painted as well so I can compare the two ideas.
For many years I have kept track of wounds (and now hull points) by using dice. However this tends to prove problematic at the best of times.
So I was looking to do some counters instead.
I picked up some skulls from Blood and Skull Industries. The plan was to use these as the markers with something on them to mark how many wounds or hull points were left.
This is idea 1 - inspired by old drawings showing Marines with studs to mark their long service:
So the studs mark the numbers of wounds/hull points left. I'm not sure though how well these stand out so I did a very quick paint job on one to see how well the studs show up...
Still undecided.
So I am going to do a second version with a roman numeral carved into the skull. I'll get that painted as well so I can compare the two ideas.
Thursday, 6 March 2014
Terrain Time - Ruins 2 & Scatter Terrain 19
Things have been quiet but I have been (slowly) plugging away. As such here is an update (small it may be however).
Ruins 2
I cut down the bases of the ruins, added some foamboard to what would be the inside of the building then added a layer of sand.
I put together a couple of more pieces, rather than corners again I did a couple of straight walls.
Picture below was taken before I did some more GS work to the join.
Tonight I started to add the rubble. This is just the first pass, once the glue has dried i'll knock off the excess and add some more. I will also add in some resin pieces.
Scatter Terrain 19
I finished adding the stores to the last of the pallets:
The last few pallets used the new, larger crates:
Next up I will give these a coat of undercoat before I start adding the tarps. Progress will thus be dependant on the weather.
So don't expect progress on them any time in the near future.
Ruins 2
I cut down the bases of the ruins, added some foamboard to what would be the inside of the building then added a layer of sand.
I put together a couple of more pieces, rather than corners again I did a couple of straight walls.
Picture below was taken before I did some more GS work to the join.
Tonight I started to add the rubble. This is just the first pass, once the glue has dried i'll knock off the excess and add some more. I will also add in some resin pieces.
Scatter Terrain 19
I finished adding the stores to the last of the pallets:
The last few pallets used the new, larger crates:
Next up I will give these a coat of undercoat before I start adding the tarps. Progress will thus be dependant on the weather.
So don't expect progress on them any time in the near future.
Tuesday, 25 February 2014
Terrain Time - Ruins 1 & Scatter Terrain 18
You may remember some time ago I did a mould for a long gone GW ruin. I used a cast of this on the second Blight Drone base and also a part on the Jabberslythe/Giant Spined Beast.
The plan was always to do more casts and use them as terrain.
Finally got round to starting these.
Ruins 1
As you can see this is very early in the build. I need to build the bases up next with some foamboard (as I did on the Blight Drone base). The Finnboard is just cut roughly to shape at the moment.
Rubble will cover the gap between the small 'islands'.
On the last piece I did a second cast of the wall with the arch then added this to the first piece. Was a bit tricky but overall very happy with it.
Scatter Terrain 18
I've cast more pallets and stowage but for this update just a quick post as I decided to do a new crate. Basically I wanted a bigger cast, so I took two cast crates and with a bit of fiddling ended up with one big cast which was then turned into a mould...
One of the best things with these stores moulds is that it allows me to minimise any waste resin. Any excess mixed up can simply be poured in, then bits of scrap resin from pour vents, sprues etc can be chucked in as well...
And half hour later we have the first cast:
The plan was always to do more casts and use them as terrain.
Finally got round to starting these.
Ruins 1
As you can see this is very early in the build. I need to build the bases up next with some foamboard (as I did on the Blight Drone base). The Finnboard is just cut roughly to shape at the moment.
Rubble will cover the gap between the small 'islands'.
On the last piece I did a second cast of the wall with the arch then added this to the first piece. Was a bit tricky but overall very happy with it.
Scatter Terrain 18
I've cast more pallets and stowage but for this update just a quick post as I decided to do a new crate. Basically I wanted a bigger cast, so I took two cast crates and with a bit of fiddling ended up with one big cast which was then turned into a mould...
| Original master on the left, new larger crate master on the right. |
One of the best things with these stores moulds is that it allows me to minimise any waste resin. Any excess mixed up can simply be poured in, then bits of scrap resin from pour vents, sprues etc can be chucked in as well...
And half hour later we have the first cast:
Sunday, 23 February 2014
Blessings of the Plaguefather - Giant Spined Beast 2
Just a quick update on the Beast.
Horns added and the front claws. Used the dremel to remove all of the modelled on bases detail the claws were on.
Used some ruins to go on one side which the left front claw will be on.
It was only when taking the pictures that I realised with the ruin there you can't see the areas I carved out and Nurgly-fied. Will go back and work on the wall so you see more of the Beast.
Also did more small jobs like gap filling, touching up some GS work etc.
There will be lots of rubble on the base including areas built up which the other front claw will be grasping on to.
Horns added and the front claws. Used the dremel to remove all of the modelled on bases detail the claws were on.
Used some ruins to go on one side which the left front claw will be on.
It was only when taking the pictures that I realised with the ruin there you can't see the areas I carved out and Nurgly-fied. Will go back and work on the wall so you see more of the Beast.
Also did more small jobs like gap filling, touching up some GS work etc.
There will be lots of rubble on the base including areas built up which the other front claw will be grasping on to.
Monday, 17 February 2014
Blessings of the Plaguefather - Giant Spined Beast 1
Well first off i'm not doing the FW model. Just to make that clear before I get questions. I will however be using the rules from FW to field this model.
So I took the Jabberslythe model and started putting it together. I have decided to leave the wings and the little third set of legs off.
I'm not sure about the base. Wondering if it is a bit big, though was everything is added it might look better sized. Plus it might be appropriate for the FW model to keep the base this size (though not having the FW model i'm not sure for certain how big it is).
I added some Nurgley touches to match in with the other Daemons. This included carving into the body with the Dremel. All the GS needs some work yet though.
I'm undecided about the beard. I may just carve it all off.
Plenty left to do including working on the base which I will have to work on as I finish him.
So I took the Jabberslythe model and started putting it together. I have decided to leave the wings and the little third set of legs off.
I'm not sure about the base. Wondering if it is a bit big, though was everything is added it might look better sized. Plus it might be appropriate for the FW model to keep the base this size (though not having the FW model i'm not sure for certain how big it is).
I added some Nurgley touches to match in with the other Daemons. This included carving into the body with the Dremel. All the GS needs some work yet though.
I'm undecided about the beard. I may just carve it all off.
Plenty left to do including working on the base which I will have to work on as I finish him.
Subscribe to:
Posts (Atom)