
In the last post I mentioned rebar (i think, or I did in the comments, I can't remember now) and I spent quite a lot of time online last night trying to find someone who makes scale model rebar.
No one does.
Except in Japan.
This is annoying.
After that disapointment I spent far too much time trying to make rebar. This was not fun. In the end I got something together good enough to at least try casting it into a wall piece to see how things go. This evening I had another go at making rebar, which actually was better and didn't give me a headache in the process.
Rebar Attempt One:
 |
| The rebar wasn't great, but cast in it doesn't look bad. I like the look of the damage. |
Rebar Attempt Two:
 |
| Ironically while the rebar looked better I don't think the damage works as well. I also think the rebar shifted in the mould so wasn't central. |
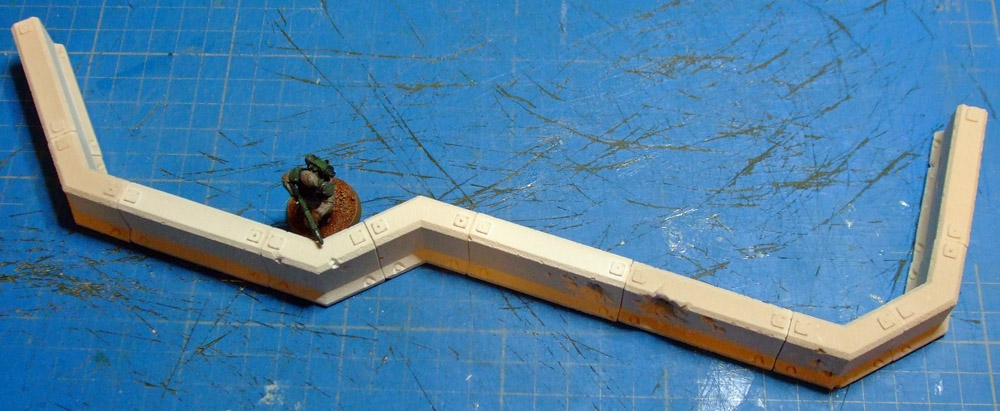
After sometime casting (mainly spent waiting around, I will have to do two moulds of each piece when I start properly cranking these out) I had enough for a small setup.
Militiaman Barry for scale.


I have also been thinking about what to do with vehicles, in the sense that these walls are too low for a vehicle to have any protection. So below is the quick concept sketch I knocked up this afternoon. Basically where vehicles are going to be set up in a defensive line lower blocks (or plinths) are first fitted in place before the regular wall piece is lowered onto them. A cutout in the plinth allows troops to shelter behind it and still fire at the enemy.


The concept still needs more work but in principle I think I'll be going with it.
Sweet! The blast effects look fantastic, the plaster definitely was the way to go for that. Love 'em! Really looking forward to seeing how the firing slit plinth turns out. Keep up the great work!
ReplyDeleteThese poss just keep getting better mate. I think the rebar looks good and the damage effect isn't all that bad.
ReplyDeleteFor rebar, did you consider using small gauge screws - cutting the top and bottom off them (or not) and fitting them inside.
The tank set up is another great idea - particularly with the firing slit - well thought out.
Can't remember if you have mentioned this before - but if you get enough interest did you fancy going into production on these for resale?
I considered using bolts but I would need very small ones, M1 as anything bigger wouldn't work, plus the aim is to get some which are bent (as rebar would be) which I just don't think i'll be able to do using fixings.
DeleteI am open to selling casts, it will really just come down to time and demand. I would have to do several moulds probably otherwise the amount of time it takes up would mean i'd have to sell them for too much to make them worthwhile.
What are the walls cast in? Doesn't look like resin, more like High-density foam or maybe that's just the texture of the wall coming through.
ReplyDeleteRegardless, looks awesome!
It is just a casting plaster (like plaster of paris, do you know the name? It might be known by something else in the US?).
DeleteThe texture some from the rough surface of the 3D printed masters.
Screws are a great idea for rebar... I can imagine you spending hours in B&Q trying to figure out the right looking ones though!
ReplyDeleteNot too sure on the barrier extensions just yet... something doesn't sit quite right.
When I convince you to make and send me some I'd be looking to add magnets to the end face of each so that they can quickly clip and stick together for gaming (of course, for integrated scenery and stuff that wouldn't be needed).
The plinths still need work, I have an alternative idea which I may go for, it will come down to dimensions really and what works with the tanks themselves.
DeleteMagnets aren't such a bad idea but I probably won't bother with it myself. If the idea was put up before I had the masters printed I could of incorporated a recess into the side to accept a magnet.
Actually Oink has a good point - Magnets on the ends would help maintain the integrity of the total barrier on the tabletop.
ReplyDeleteOne thing to consider is that if you're using normal plaster, it'll chip even more over time. This is a problem if you're casting it white, however, if you mix a tiny amount of thinned out paint into the water that you're using for the plaster, it'll colour all the way through without any loss of strength, which a good staining for paint after it's dry would do.
ReplyDeleteAhead of you! I did that exact thing when I did some tank traps a few years back...
Deletehttp://i25.photobucket.com/albums/c80/squirrelnation/Terrain/Obstacles/tanktrapcloseup.jpg
I've not bothered with these as they really are just experiments which I can play around with. They will be chucked (or recycled) eventually when I settle on the final design.