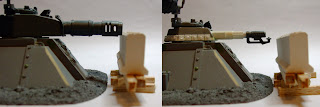
After spending more time playing around with the concepts taking into account the dimensions of the Leman Russ I have some more pictures...
Once I had the dimensions to the hull and turret weapons it became obvious that Option A was a non-starter as the plinth would only be 15mm tall, no where near enough height to get a firing port in to allow infantry to fire through. This was a shame as Option A was my favourite of the three and the initial idea I had when thinking of doing a plinth to raise the walls up to protect tanks.
So my attention turned to Options B & C.
Option B Mk 2:
Option B - I've gone off this concept. The height of the plinth meant I needed two steps and i've ended up with a step too narrow for a figure on a base to stand on. The plinth itself just looks naff, far too big and chunky, not what I was after at all. I could modify the steps so the lower one is narrow and the top one is big enough for a base but that will just make the piece even more chunky and horrible.
Option C Mk. 2:
Option C has changed slightly, namely the height so the wall will sit under a Russ turret weapon. The firing slot is sized so that infantry standing on the firing step can fire through as well as the Russ hull and sponson weapons.
I prefer this to the Mk. 1 version. It looks more balance being shorter, i'd prefer the firing window to be smaller but it can't unless it isn't used for infantry or the Russ hull weapon (neither I would be happy with losing). I could raise the firing step but I don't want to make the bottom too thick as I don't want to end up with a base like that on Option B Mk 2 above. Still some room for tweaking, but in general I like this more than Option B Mk 2 and Option C Mk 1.
Option D Mk 1:
Option D is a development of Option B. Basically the main thing I disliked about Option B was the firing step so I thought about doing an alternative which could have a firing step but avoid the big block that Option B Mk 2 turned out to be.
The design principle of the defensive walls in general was 'low-tech'. Basically simple designs made from cheap, readily available materials, reinforced concrete which could for example be cast on site.
Sticking with this principle I had the idea of having a removeable firing step, only the plinth itself would be a concrete cast but would incorporate a groove which a firing step if required could be slot into. Using wooden planks as the firing step and either cast blocks or bricks (or something else) as a support.
The assembly setup below shows much better what I mean:
What I would do is assemble the steps with the supports all in place, during set up of a game I would then have the option of having the step or not depending on my deployment needs and the space availble. This solution cuts down hugely on both the 3D printing costs and the casting and makes set up more flexible.
Walls, Chimeras & Gun Turrets...
I also got out tonight a Chimera and a gun turret to see how they work with the walls.
Chimera - With a regular wall unsurprising the Chimera is too big to get protection. Adding 15mm to the height gives the wall enough to protect the tank, the turret can happily fire over. As such i'm happy that the walls I go with will work as well for the Chimera as it does for a Russ.
Gun Turrets - With the additional 15mm height the turret weapon sort of sees over the wall, ideally it would be better if the wall was 1-2mm shorter. However the normal wall covers enough of the gun turret for it to claim it is in cover.
The picture below shows how much of the gun turret would be covered by the walls.
I am planning on removing the mounting plate detail on top of the wall pieces. It just doesn't come out detailed enough on the 3D prints or the casts. So the plan will probably be to make a new master which I will then cast in resin and then attach to the walls. I will probably scratch build one initially but depending how it turns out I may get it 3D printed in a more higher spec material.
I was thinking of removing the plates and doing new moulds this weekend but I'm running short on rubber, as such it'll have to wait till some more turns up.
As before let me know your thoughts and suggestions.


Instead of the plates, how about a hoop... I imagine this could be used to winch the cast barricades into position...
ReplyDeleteOf course, you wouldn't get a proper hoop, but a sideways "D" could let you simply paint a dark patch or drill out the hole...
It's nice seeing your development work!