Recently life has been somewhat devoid of models, instead it has been full of building furniture, moving stuff from one place to another, sorting, chucking crap and so on.
I'm knackered.
However the three Looted Wagons are almost stripped so this sunday I will be starting on them properly, update to follow that night or Monday.
Miniature Wargame Conversion...
My first article is up on MWC. For a change it has no Orks in it, instead it is regarding some techniques in converting Nurgle vehicles.
It can be found here.
While you are there check out the competition the guys have running currently, it might give you some inspiration or motivation with a project.
Normal service should be resumed shortly...

Wednesday, 15 February 2012

Saturday, 11 February 2012
Looted Wagons 13
I know.
'No more Looted Wagons for a while...'
'Will work on my own Ork/Militia projects...'
So anyway i've been commissioned to build three Looted Wagons which I have now started work on.
I managed to get hold of three Leman Russ tanks off eBay which were in a good state and for a decent price.
The request was for three 'Destroya' type along the lines of these two Looted Wagons I did previously:


This will be a new thing for me as normally I would only build one vehicle at a time and I just don't do multiples. The only reason I did two Destroya's was because due to the second one being for the Bell of Lost Souls article.
However by giving each one something different and varying the look within the Destroya' style I hope the project will be enjoyable as building three vehicles which are completely different.
The basic pre-loot work has now started, this covers breaking the vehicle down and stripping paint. Only once this is done will I start to add to what is left.

I hoped to have them stripped today, but due to real life issues (including the repercusions of a leaking roof) and running out of Fairy Power Spray I couldn't get the paint off them. I hope tomorrow will see that done so that I can start cutting a gluing styrene next week.
Not a huge post I know, but I thought it would be nice to get the ball rolling on this one. Once styrene starts to go on i'll do another update.
'No more Looted Wagons for a while...'
'Will work on my own Ork/Militia projects...'
So anyway i've been commissioned to build three Looted Wagons which I have now started work on.
I managed to get hold of three Leman Russ tanks off eBay which were in a good state and for a decent price.
 |
| Leman Russ, Leman Russ Demolisher & a new kit Leman Russ |
The request was for three 'Destroya' type along the lines of these two Looted Wagons I did previously:


This will be a new thing for me as normally I would only build one vehicle at a time and I just don't do multiples. The only reason I did two Destroya's was because due to the second one being for the Bell of Lost Souls article.
However by giving each one something different and varying the look within the Destroya' style I hope the project will be enjoyable as building three vehicles which are completely different.
The basic pre-loot work has now started, this covers breaking the vehicle down and stripping paint. Only once this is done will I start to add to what is left.

I hoped to have them stripped today, but due to real life issues (including the repercusions of a leaking roof) and running out of Fairy Power Spray I couldn't get the paint off them. I hope tomorrow will see that done so that I can start cutting a gluing styrene next week.
Not a huge post I know, but I thought it would be nice to get the ball rolling on this one. Once styrene starts to go on i'll do another update.
Thursday, 9 February 2012
City Fight 2 - Concept Work Continued
I'm not doing Cityfight.
I just wanted to make that clear before I got into this second post with concept work for Cityfight (which i'm not doing, let's be absolutely clear about this).
After the comments on Part One I thought I would do a little more more on the concept and to help clarify the ideas.
Now that is out of the way...
First up the edging (and the roof lining/edging would also follow the same principle). Basically the edging would not be a continuous strip, it would be a small length (25-30mm long) printed then cast. This allows the building to be of a range of heights.
The edging pieces will be styled, though I will not be going down the GW route. So there will not be hundreds of skulls or random bits of machinery stuck on etc. The pieces would be embossed, engraved, shaped etc which suit being printed far more than being scratchbuilt.
In the one picture above you can see the corner pieces. These will not be plain pieces but designs something like (something like, not identical to) the model below. The general idea is fine, but the final piece would probably have wings of somekind either side of the eagles head, underneath the head I was thinking something like a mounting point for a light to hang down on a chain and also a hole for guttering to run through up to the roof.
And here is the concept (yes concept, not design. These are ugly, bulky, too big and a whole host of other things, they do however make it clear what the idea for the windows would be) of the window frames - the door frame would be similar.

Each frame is built out of smaller pieces with which will allow a range of window sizes to be done. A door would be similar in principle though the bottom would lead into steps.
In the pictures you can see the external and internal frames. The external frame would be larger and more decorative, the internal would be little more than a thin frame. What you can see in the section view is that the two frames do not meet. The gap is so that you can slot something in place...
And here you see what would be slotted into the frame, namely clear acylic broken up to look like broken windows.

And the last thing to show is one of the detail pieces I would look at doing, namely floor support/brackets. I butchered the roof corner piece shown above to come up with a quick model which would sit over the roof beams.

That is it for today, and probably a while as I really have too much on to get distracted.
I just wanted to make that clear before I got into this second post with concept work for Cityfight (which i'm not doing, let's be absolutely clear about this).
After the comments on Part One I thought I would do a little more more on the concept and to help clarify the ideas.
To be absolutely clear these ARE NOT designs I am thinking of doing. Any finished designs would not look like this. They are not even WIP designs. These are purely shapes and quick sketches to show the basic principles I am thinking of (one day) doing.
Now that is out of the way...
First up the edging (and the roof lining/edging would also follow the same principle). Basically the edging would not be a continuous strip, it would be a small length (25-30mm long) printed then cast. This allows the building to be of a range of heights.
The edging pieces will be styled, though I will not be going down the GW route. So there will not be hundreds of skulls or random bits of machinery stuck on etc. The pieces would be embossed, engraved, shaped etc which suit being printed far more than being scratchbuilt.
 |
| I know they look ugly. They are just here to help explain why I will be printing them. |
 |
| The edging pieces lined up in situ. |
 |
| Just a random detail shot of the wing. Just because. |
In the one picture above you can see the corner pieces. These will not be plain pieces but designs something like (something like, not identical to) the model below. The general idea is fine, but the final piece would probably have wings of somekind either side of the eagles head, underneath the head I was thinking something like a mounting point for a light to hang down on a chain and also a hole for guttering to run through up to the roof.
 |
| Again, it is just a sketch, not the actual design. |
 |
| Models eye view on left. |
And here is the concept (yes concept, not design. These are ugly, bulky, too big and a whole host of other things, they do however make it clear what the idea for the windows would be) of the window frames - the door frame would be similar.

Each frame is built out of smaller pieces with which will allow a range of window sizes to be done. A door would be similar in principle though the bottom would lead into steps.
In the pictures you can see the external and internal frames. The external frame would be larger and more decorative, the internal would be little more than a thin frame. What you can see in the section view is that the two frames do not meet. The gap is so that you can slot something in place...
 |
| I know it looks horrible. |

And the last thing to show is one of the detail pieces I would look at doing, namely floor support/brackets. I butchered the roof corner piece shown above to come up with a quick model which would sit over the roof beams.

That is it for today, and probably a while as I really have too much on to get distracted.
Wednesday, 8 February 2012
Recalcitrant Daze - Ten Months and Still Going, Surprisingly.
The eighth of the month has rolled around again, so once more I shall subject you to the ‘Recalcitrant Daze Monthly not-sure-why-I-do-these-posts-but-I-started-it-so-I-will-have-to-continue Post’*.
Bastions – again to fit with the design aesthetic of the defensive walls.
Cityfight – detail pieces for buildings such as doors/windows, steps, edging pieces.


Rictus.
So yeah, RD hits Ten Months since its debut post. Not exactly a milestone on par with this years diamond jubilee but I’m still pretty pleased how it is plodding along.
The last month has seen two things dominate on RD – Looted Wagons and 3D modelling/printing.
The former was a pretty straight forward build ‘em and sell ‘em job but was enjoyable none the less. The gentlemen who bought the last two wagons has commissioned me to build three more Looted Wagons based on Leman Russ tanks. As such you will be seeing more Looted Wagons in the near future (in the next few days work will begin) which after saying recently that I won’t be doing any more for some time proves just how little I can be trusted when the prospect of some money is laid in front of me…
…however the money brought in by the Looted Wagons has funded the experiments into 3D printing, as such one mustn’t grumble when given the chance to turn more of my 3D models into prints.
Unfortunately I have more ideas of what I can use 3D printing for than I could turn into projects. Possible terrain ideas alone include:
Gun Emplacement (though already started printing parts so no longer in the 'possible pile’).Trench system – wall panels, straight floor & junction floor panels as a minimum.
Modular bunkers – to fit in with the defensive walls.Bastions – again to fit with the design aesthetic of the defensive walls.
Cityfight – detail pieces for buildings such as doors/windows, steps, edging pieces.
I’m never going to get all that done. Least likely are new bastions (too costly) and cityfight (I haven’t the room for storing ruins). Shame as I am itching to work on those cityfight pieces some more.
To end I would like to thank the new followers, thanks very much. Thanks as always to those who have posted comments, it is always appreciated. I think that is enough for this post. I will be putting up another concept post regarding Cityfight, just to help clarify some of the ideas I have (though as mentioned I won’t actually be doing a cityfight project for a long time yet...). The next proper modelling update will be the initial work on the Looted Wagons as the final base kit arrived today.
Oh, actually there is one last thing. Now I have my own range of defensive walls I have a load of GW walls going spare. They shall be up on eBay this Sunday but if anyone wants to grab a set (or multiple sets) let me know ASAP. Each set has six single and six double walls. Say £15 per set including postage?


Rictus.
* I may need a snappier title.
Tuesday, 7 February 2012
City Fight 1 - Concept Work
Right, i'm not starting a new project and while I would love to do some Cityfight ruins (I won't say Cities of Death, for it is a stupid name) but I just don't have any space for it.
However...my mind was wondering today and for some reason I got thinking about ruins and how I would do them better than my first go a few years back. While I am not doing any 3D modelling work on the defensive walls at the moment I was thinking about other aspects of terrain I could use 3D printing on and out of the blue I thought of ruins.
I have never been tempted to use the GW kits for ruins, I find them just too over the top.
I see the majority of Imperial building as being quite bleak, almost faceless and monolithic. It is for this reason I used Foarboard to make my first set of ruins, double layered to give me nice and thick walls (10mm, any less just makes the buildings look wimpy).
A few examples...


Obviously that is before any rubble and so on was added. The figure for scale is a Terminator. The ruins were quite large.
What lets them down in the detailing, While I did add things like window sills and some trimming it still left little to really grab the eye.
So today it hit me I could creat detailing pieces for any cityfight ruins I build. Casting them in plaster will be perfect for damage and so on as shown on the defensive walls.
So pieces which can be done include:
Edging pieces - corners and roof line.
Window frames - internal and external.
Signs.
Doorframes & doors.
Steps.
Buttresses - both flying and non-flying.
After a few minutes I had a quick and rough concept.
Keep in mind these are purely concept to test out the theory. The actual things I would design would be far more detailed and more fitting in with 40k - for example think Aquillas etc.

I only had time to look at edging pieces - so up the building corners and along the roof line. The roof line would either have a lip (as shown) or a groove to slot over the foamboard top, making the foamboard ends much neater.
As a concept I think it is doable. I can also see things like floor supports, light fixings and other details are possible.
If only I had mroe time, and storage space...I am already going to look at 3D printing for doing a trench system and maybe bunkers, and that is once the gun emplacement is sorted.
What do people think?
However...my mind was wondering today and for some reason I got thinking about ruins and how I would do them better than my first go a few years back. While I am not doing any 3D modelling work on the defensive walls at the moment I was thinking about other aspects of terrain I could use 3D printing on and out of the blue I thought of ruins.
I have never been tempted to use the GW kits for ruins, I find them just too over the top.
I see the majority of Imperial building as being quite bleak, almost faceless and monolithic. It is for this reason I used Foarboard to make my first set of ruins, double layered to give me nice and thick walls (10mm, any less just makes the buildings look wimpy).
A few examples...
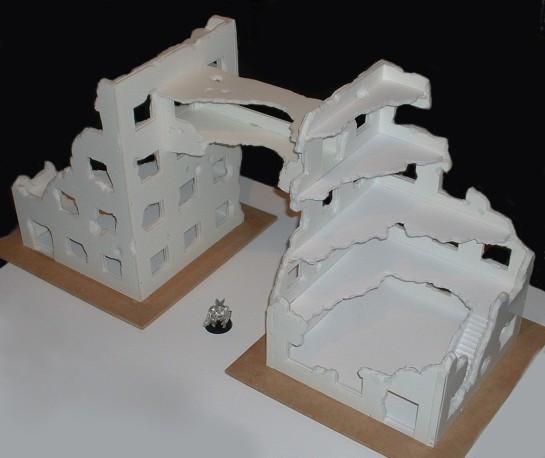


Obviously that is before any rubble and so on was added. The figure for scale is a Terminator. The ruins were quite large.
What lets them down in the detailing, While I did add things like window sills and some trimming it still left little to really grab the eye.
So today it hit me I could creat detailing pieces for any cityfight ruins I build. Casting them in plaster will be perfect for damage and so on as shown on the defensive walls.
So pieces which can be done include:
Edging pieces - corners and roof line.
Window frames - internal and external.
Signs.
Doorframes & doors.
Steps.
Buttresses - both flying and non-flying.
After a few minutes I had a quick and rough concept.
Keep in mind these are purely concept to test out the theory. The actual things I would design would be far more detailed and more fitting in with 40k - for example think Aquillas etc.

I only had time to look at edging pieces - so up the building corners and along the roof line. The roof line would either have a lip (as shown) or a groove to slot over the foamboard top, making the foamboard ends much neater.
 |
| Obviously the actual buildings would have things like doors, stairs and so on. |
If only I had mroe time, and storage space...I am already going to look at 3D printing for doing a trench system and maybe bunkers, and that is once the gun emplacement is sorted.
What do people think?
Sunday, 5 February 2012
Defensive Walls & 3D Printing 6
 In the last post about the gun emplacement I mentioned I had ordered the prints for the last pieces of the Defensive Walls, namely the plinth pieces. I have also ordered a print of the mounting plates. With no chance of success I also did a model of some rebar and I have ordered prints of it in two materials to see if I can cast my own pieces..
Anyway, while the Six Nations has been on the TV I got busy casting wall pieces. I knocked up a second mould to speed things up.

After a bit of time I ended up with this lot: I mixed in a small amount of black paint so that if the pieces get chipped you won't see white (thanks to Jake for reminding me to do it).

All that casting did get a bit boring, so I took a few of the prototype casts and did a test paint scheme.


I carved a Chaos star into the one panel, it matches the stars I have carved into some vehicles. Using plaster makes doing things like this very easy.

They have started printing my new parts so I am hoping i'll have them in a weeks time and I can get one with casting the plinths, more walls and trying out the rebar. Casting up all the mounting plates will be a ball ache even with doing them in sets of four.
For reference here are the models for the mounting plates and rebar.

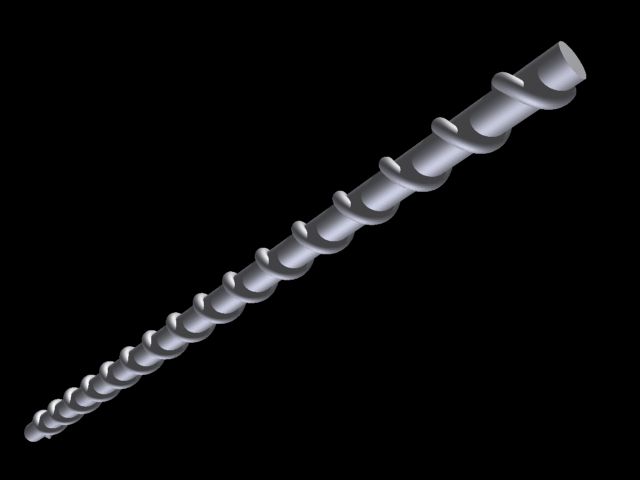 |
| The actual model I am having printed is 100mm long |
Saturday, 4 February 2012
Gun Emplacement Mk. II - 2
As the models for the Defensive Walls were finished mid week my attention turned to the gun emplacement.
The main thing was to update the models in light of the mock up I did just after Christmas. The only change to the walls was to add 2mm to the height, the real work was to the base pieces.

The internal diameter of the base wedge (on the left) changed, this meant I had to rework the treadplate, rim and rivets. I decided to increase the size of the rim slightly (1mm to 1.5mm) and then deleting the rivets and doing new ones 0.75mm in diameter. To finish off the wedge I added the lip on the inside face which the gun plate will sit on.
The step (on the right) didn't change dimensionally, but as I had redone the rim and rivets sizes on the base wedge I had to redo the step as well.
I then started looking at the gun plate itself. The plan is to either mount an Earthshaker on there (see the mock up pictures previously shown) or a FW Manticore or Hydra turret. In the centre of the plate is the locating hole for the FW turret locating peg.

The rim and rivets match the base wedge & step. The overall diameter is 77mm. At the moment the model is more of a concept, I do not know if I will have it printed or scratchbuild it. The benefit of printing will be accuracy while the negative will be the price as it is quite large. I may do it in two parts with the bottom 'disc' which will nto be detailed being scratchbuilt. I may look at doing the top plate in two halves as well to reduce printing costs.


As you can see the plate is pretty plain. I will be adding more detail on the top surface to make it look more interesting.
However you will not see much of the plate due to the size of the Earthshaker or FW turret which will be sitting on it.

The layout above shows the gun plate - the 77mm overall diameter with the inner line showing the rim (1.5mm offset from the outside edge). The dashed line - of diameter 67 - is the hole which the gun plate drops into (i.e. the hole shown in the first assembly picture in this post). The inner circle of 51mm diam is the FW turret. The other shape on there you have probably already worked out is the Earthshaker base. As you can see there really isn't much room to add any detail. My original idea was to have a hatch each side, but with only 8mm each side between the FW turret and the hole the plate drops into it is unlikely a hatch will work. However I will look at it, as well as other gubbins such as a system the crew would use to turn the platform. This would be swappably with something else if the gun plate was build for a FW turret.
So overall the gun emplacement has moved forward, though there is still some way to go. However...Thursday I ordered the prints for the final pieces for the Defensive Walls and at the same time I also ordered the walls for the emplacement...so in one form or another the gun emplacement will be happening...
The main thing was to update the models in light of the mock up I did just after Christmas. The only change to the walls was to add 2mm to the height, the real work was to the base pieces.

The internal diameter of the base wedge (on the left) changed, this meant I had to rework the treadplate, rim and rivets. I decided to increase the size of the rim slightly (1mm to 1.5mm) and then deleting the rivets and doing new ones 0.75mm in diameter. To finish off the wedge I added the lip on the inside face which the gun plate will sit on.
The step (on the right) didn't change dimensionally, but as I had redone the rim and rivets sizes on the base wedge I had to redo the step as well.
 |
| The assembled pieces with the revised base wedge and step in place. |

The rim and rivets match the base wedge & step. The overall diameter is 77mm. At the moment the model is more of a concept, I do not know if I will have it printed or scratchbuild it. The benefit of printing will be accuracy while the negative will be the price as it is quite large. I may do it in two parts with the bottom 'disc' which will nto be detailed being scratchbuilt. I may look at doing the top plate in two halves as well to reduce printing costs.


As you can see the plate is pretty plain. I will be adding more detail on the top surface to make it look more interesting.
However you will not see much of the plate due to the size of the Earthshaker or FW turret which will be sitting on it.

The layout above shows the gun plate - the 77mm overall diameter with the inner line showing the rim (1.5mm offset from the outside edge). The dashed line - of diameter 67 - is the hole which the gun plate drops into (i.e. the hole shown in the first assembly picture in this post). The inner circle of 51mm diam is the FW turret. The other shape on there you have probably already worked out is the Earthshaker base. As you can see there really isn't much room to add any detail. My original idea was to have a hatch each side, but with only 8mm each side between the FW turret and the hole the plate drops into it is unlikely a hatch will work. However I will look at it, as well as other gubbins such as a system the crew would use to turn the platform. This would be swappably with something else if the gun plate was build for a FW turret.
So overall the gun emplacement has moved forward, though there is still some way to go. However...Thursday I ordered the prints for the final pieces for the Defensive Walls and at the same time I also ordered the walls for the emplacement...so in one form or another the gun emplacement will be happening...
Subscribe to:
Posts (Atom)