Pages

Tuesday, 21 June 2011

Poisoned Chalice - 4

I am off out tonight to see the film about Ayrton Senna, as it is unlikely I will have time to do anything model wise I thought i'd get the follow up post to last nights Poisoned Chalice post up early.

If I have time i'll be able to do everything in one single post, but that does mean a lot of pictures so it may end up being split in the end.

Moving on from the previous post the boards were given an all over black undercoat.


These boards would have to match the colour of the Realm of Battle panels they would be joining up with, as such the plan was for me to paint as much as I could while I had the boards sitting in my garage then to take them to the person who had painted the RoB boards (along with the trees & some other scatter terrain pieces) and paint the mud and rock with him, ensuring everything sat nicely together. At that point I would also do any last minute changes along the edges so that these two panels butted up with the RoB panels nicely.

So with all that in mind I set about painting the wing areas, the rubble piles and the excavation pit.

The excavation pit - Concrete slab with wooden panelling & steps.


Rubble pile, lots of rock along with discarded panels, wire, fencing
and a bucket.


Fencing, forgot to get a picture after the oils and washes were added.
The excavated part of the wing - PIP, more was done to it once the rest
of the board had been painted.
Unfortunately it appears I didn't get pictures of the other rubble pile area at this stage.

After a trip 'down south' the mud and rock got painted...


You can see that some thinned washes were added and more highlighting
done to the wing detail once the rock around it had been painted.


 Washes were added to the rock faces in certain places to give some more texture to it.

You can see in the close up pictures above the final texture on the rock face achieved by using the tissue paper and PVA/filler mix.

Some foliage was added in the rock crevices/shelves to bring more colour to it and break up the grey. On the muddy area I picked out individual rocks (not a fun job) which again broke up the browns the mud had been painted in.

Water effect was added to the mine shaft which brought something new to the board and also got over the fact without making the board even deeper there was no way to get round the fact the shaft just suddenly ended. Some battered barrels were added as thought they had fallen (or blown) into the shaft and were now floating in the water.

I think that is enough for one post. The final part will follow tonight or tomorrow. It will show the detail pieces I built to give the board more character as well as some in game shots I got from Games Day itself.

Poisoned Chalice - 3

Another 'lookey at what I did in the past' post. So need a name for these posts.

At the weekend I took apart the Poisoned Chalice board. After its swansong at the Open Bash at Warhammer World the week before it was time to break it down so it can be stored untill I can re-use the materials.

So it seemed appropriate for the next catch up post to be of the board. I will end up splitting this into 2 or 3 posts as there are so many pictures.


So I'll begin with building the board pieces, move onto painting them then finish off with showing the extra pieces I built for it.

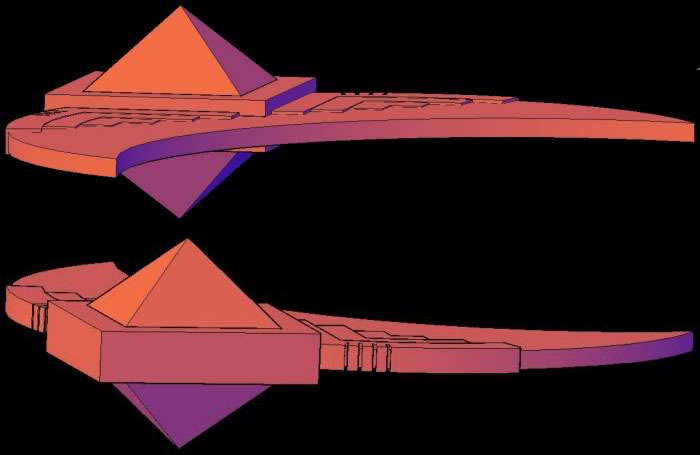
The basic idea for the board was to have a buried Necron ship, orientated so that the tip of one wing coming out of the ground. This tip has been encased in rock as part of a 'someone-made cliff'. The very top of the wing has become exposed, a Rogue Trader hearing rumours came to investigate, excavating part of the cliff face to ascertain what was buried, once that was done he set about digging a shaft down to the ships likely centre to see what he could claim.


The design I came up with for the buried ship, even though only a small
part of it would be shown I wanted to get the overall look and shape sorted in my head.

The basic wing tip in styrene, Militiaman Bob for scale

Adding the detail, layering up styrene, notches added and Necron
glyph panels which really added a lot to the look.

Few more details giving the whole thing more depth.
The wing tip was made in styrene while the board and rocks were built up in foam, the wing was then slotted in place before more foam was built around it.

The wing slotted in place - the red area was where the
excavated area was to be.

More foam added around the wing. Foam was shaped so that this
panel would butt up against a GW RoB panel.

The excavated area showing the wing detail.
I than started adding both filler to the foam, filling in gaps etc. I also began adding the rubble piles where the excavated rock had been shoved aside (by an Atlas) from the excavated area. The excavation pit with the mine shaft was also carved into the foam, crossing over both panels. I did the whole thing in two panels for ease of transport.

Detail inset showing a discarded tool.

The first two rubble piles and the beginning of
the mine shaft (better shown below)

Some unused Demo charges.
 
At the rear steps were carved in to show where the planets 'primitives' had
come to worship the marvel of 'the tip...'. Also meant in games people could
access the whole gaming area and use the height.

The rubble pile next to the excavation pit which crosses the two panels.
The excavation pit, modelled to show (hopefully) a concrete
layer laid down on the two flat areas next to the Hades ramp.
Fencing and wooden panneling added round the pit and
down the ramp sides.

These two pics show the texture added to the panels, I wanted a dug up
well worn look created by the engineering vehicles driving all over it.

The ramp created by the Atlas with a dozer blade, giving access to
the excavated area of the wing.

You can see a lot more foam was added and plenty of filler.
The mountain was given a coat of primer to show up areas which needed work.
This was followed by tissue paper layered on with a mix of PVA and thin filler.
It gave a nice texture and protected the foam well (really well).

Next up i'll show these panels painted up. That will show the texture on the rock much better than the pic above.

Sunday, 19 June 2011

Battlefleet Gothic 3

The fleets start to come together...

I have decided, definately, almost certainly, on doing a Nurgle Chaos Fleet and an Imperial Navy Fleet. They will be 2000 points (ish). I wasn't originally going for that many points but due to a combination of wanting certain things (like AdMech elements in the Navy fleet, a Battleship in each and already building some bits that when I looked at the fleet lists meant I had to take a certain amount of other things) I have ended up going for 2k. I will then take elemets from a fleet for smaller games.

The Chaos fleet seems to be coming together quicker than the Navy one. I already have five Cruisers in various builds, one of which is being converted into a Heavy Cruiser. A sixth cruiser is winging its way from eBay as we speak. As are all the escorts I need I think and possible the Battleship.

Some more plastic Navy cruisers are also on their way as of about fifteen minutes ago.

So picture time. Against all expectations I have actually started painting...


These are the first three Chaos Cruisers:
Left - Painted
Middle - Undercoated
Right - Awaiting some turrets.


Joining him is the fourth Chaos cruiser...an Imperial Cruiser which was boarded in an engagement and claimed by Papa Nurgle as his own.


The fifth cruiser I had I did a cut and shunt job on it. It gre in length and depth. Game wise it'll be Retaliator Heavy Cruiser.


Might see if I can get the second cruiser painted tomorrow. Two days painting in a row may be asking too much however.

Wednesday, 15 June 2011

Mordheim Beastmen 1

Been quiet model wise since the Bash. Always get a post Bash/Games Day lack of motivation period, but I did manage to start assembling the first bits of Beastmen I have for the first Mordheim warband.

I am still awaiting the Gors to arrive so they and the Centigor conversion will have to wait.

As me and Maelstrom aren't really planning a campaign but instead just to play one off games where we will put together a warband for each one I am just building a range of different figures.

So far we have seven figures in various states of build. Some are just blu tac jobs at the moment to see how things go together.


So from rear left:
Chieften with two handed weapon.
Bestigor with two handed weapon
Bestigor with two weapons
Bestigor with halberd
Ungor with axe (and shield to come)
Ungor with spear
Ungor with spear.

To add to these will be:
2 more Ungors with weapons of some kind.
Three Gors
Shaman (Gor conversion)
Centigor (Gor conversion)

Tuesday, 14 June 2011

Imperial Guard Command Chimera

I have bascially given up on the 'Friday & Monday From the Archive Posts' as I never seem to get one up on a Monday or Friday.

So I'm just going to post something up when I think of it.

The original plan was to get some pictures of the Poisoned Chalice board up showing the details you haven't seen yet in the previous posts on it, which were really just showing the repair work. However I am sorting some better pictures out first.

So in the meantime here is a quick and easy one.

I built this Command Chimera four years ago now, before I decided to only do CRM. Thus not not after I built it it ended up on eBay.


So the main things that were done to make this Chimera stand out from the regular Chimeras in the force are:
1. Rear door removed and a FW Eagle added.
2. Lasgun ports removed and rear squared off.
3. Stowage and other details added to top.
4. Removeable side skirts added.
5. Predator turret modified with a co-axial Heavy Stubber and removeable HK missile plus comms added.

Quite a simple conversion job and I was quite happy with the end result, though I admit I prefer the CRM Command Chimera I did not too long after this one.

WIP pictures...


The centre piece, with the hatch, mesh vents etc was added later
as once I had undercoated the tank that area looked too plain.