Pages

Tuesday 31 January 2012

Defensive Walls & 3D Printing 5a

Just a small update really, barely warrants an update in fact. I'm beginning to wonder if I update too often and whether people would prefer more spaced out update with more content rather than posting every couple of days (or sometimes every day). Should I post less...?

Anyway, in the last post I said I was going to order the Plinth piece this evening.

This hasn't happened. When I uploaded it is as pretty pricey as it is rather chunky, far more material than the original wall pieces. As such I deciced to have another play today with the model to bring down the price.

I initially built a recess into the bottom of the plinth to reduce the material and this brought the price down by about a third. But I decided that there was no reason why the plinth was the same length as the wall piece.

So the final design for the plinth is this...


It is 25mm long, so half the length of the wall piece. As such the printing cost is less than half that of the original plinth design.

I can't seem to stop playing around with designs though and after doing that piece I thought 'why can only the straight walls have plinths?'. Not too long after that I also had a corner plinth...


This will give me more set up possibilities - not only for having tanks behind better protection, not having any pesky missiles fly through the gap between tall walls but also will allow me to have two lines of defensive walls, with the second wall firing over the first wall.

It should look pretty good.

Tomorrow, for certain, I will be ordering the two plinth pieces. I will combine them into one file and thus cut down on setting up costs. I have also done a quick model of the mounting plate which I will get printed in a Fine Detail material, I will compare it to the scratchbuilt plate and see which looks best before choosing which one to cast up for the walls. It shouldn't take long for the prints to arrive so in a couple of weeks time I should have a big set all cast up...

Monday 30 January 2012

Defensive Walls & 3D Printing 5

So I made a small mounting plate and did a couple of casts...


I have finalised the plinth as well. It is officially Option B Mk 4.

I changed the base slightly, changing width at the base and chaning the chamfer so it ran up to the main body. The only other change was to add the recesses and the shallow holes. These are for when I have some of the plinths set up as terrain or damaged where the upper wall piece isn't in place. The shallow holes will be drilled out, the holes are for the locking bars to be hammered into to secure the upper wall panel (that make sense?).


Basically the mounting plates will be fitted inside the recess as shown below...


I am going to go ahead with this option - the 3D print will be ordered tonight...

In the meantime I am going to crack on with casting some walls and adding the mounting plates - i'll be doing a second mould of each to speed things up (though I am waiting for some rubber to arrive before doing the mould for the wall pieces).

Hopefully the 3D print won't take long to arrive again.

Sunday 29 January 2012

CRM Veterans 2

Had a chance to look at the Backpack I had printed.

Now I think the basic design looks pretty decent, however the print resolution is just not good enough for these. While I could probably improve it with some fine wet and dry sandpaper there are some areas which I just will not be able to get to (the ends of the lower canister are recessed) and I will probably end up losing some details.


As the print is hard to see due to the material I gave it a quick coat of spray. I manipulate the pictures slightly to show the surface texture better - keep in mind though that some of the roughness in the pic looks worse because of this.


I glued it to the back of a Cadian torso to see how it looked in position. Size wise it looks fine and the fit seems decent. I may change the mounting plate which is in contact with the torso so it is a bit taller and has mnore contact with the torso.

KEEP IN MIND that the torso is not finished and I am not going to use the pipe shown. The pipe just looks too thick and it is impossible to position so it looks right. Much better than guitar wire but still not user friendly. Going to have to use something else instead.


Above is a comparison shot with a FW militia torso who form the bulk of my infantry force.

There is an opportunity of me being able to get the backpack printed at a higher resolution, I am going to do a couple of refinements to the backpack and then cross my fingers that I can get a better print done.

In the meantime I will use this print as a prototype to play around with different pipe options.

Friday 27 January 2012

Defensive Walls & 3D Printing 4

After spending more time playing around with the concepts taking into account the dimensions of the Leman Russ I have some more pictures...

Once I had the dimensions to the hull and turret weapons it became obvious that Option A was a non-starter as the plinth would only be 15mm tall, no where near enough height to get a firing port in to allow infantry to fire through. This was a shame as Option A was my favourite of the three and the initial idea I had when thinking of doing a plinth to raise the walls up to protect tanks.

So my attention turned to Options B & C.

Option B Mk 2:


Option B - I've gone off this concept. The height of the plinth meant I needed two steps and i've ended up with a step too narrow for a figure on a base to stand on. The plinth itself just looks naff, far too big and chunky, not what I was after at all. I could modify the steps so the lower one is narrow and the top one is big enough for a base but that will just make the piece even more chunky and horrible.

Option C Mk. 2:


Option C has changed slightly, namely the height so the wall will sit under a Russ turret weapon. The firing slot is sized so that infantry standing on the firing step can fire through as well as the Russ hull and sponson weapons.

I prefer this to the Mk. 1 version. It looks more balance being shorter, i'd prefer the firing window to be smaller but it can't unless it isn't used for infantry or the Russ hull weapon (neither I would be happy with losing). I could raise the firing step but I don't want to make the bottom too thick as I don't want to end up with a base like that on Option B Mk 2 above. Still some room for tweaking, but in general I like this more than Option B Mk 2 and Option C Mk 1.


Option D Mk 1:


Option D is a development of Option B. Basically the main thing I disliked about Option B was the firing step so I thought about doing an alternative which could have a firing step but avoid the big block that Option B Mk 2 turned out to be.

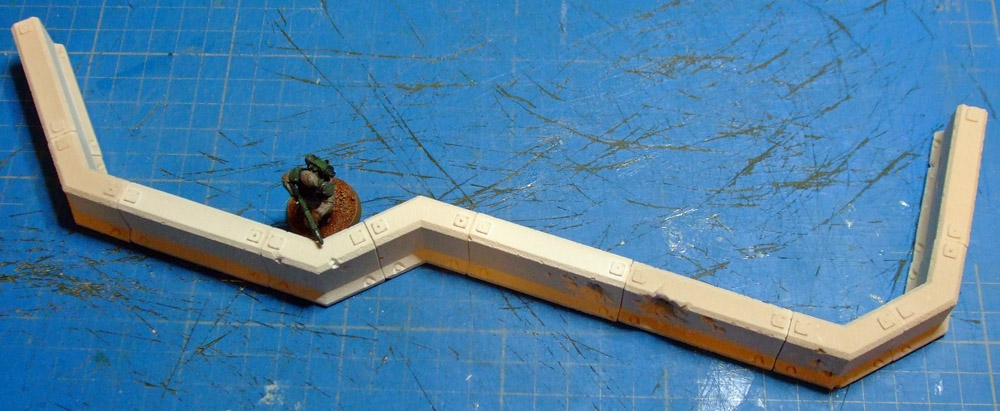
The design principle of the defensive walls in general was 'low-tech'. Basically simple designs made from cheap, readily available materials, reinforced concrete which could for example be cast on site.

Sticking with this principle I had the idea of having a removeable firing step, only the plinth itself would be a concrete cast but would incorporate a groove which a firing step if required could be slot into. Using wooden planks as the firing step and either cast blocks or bricks (or something else) as a support.

The assembly setup below shows much better what I mean:


What I would do is assemble the steps with the supports all in place, during set up of a game I would then have the option of having the step or not depending on my deployment needs and the space availble. This solution cuts down hugely on both the 3D printing costs and the casting and makes set up more flexible.

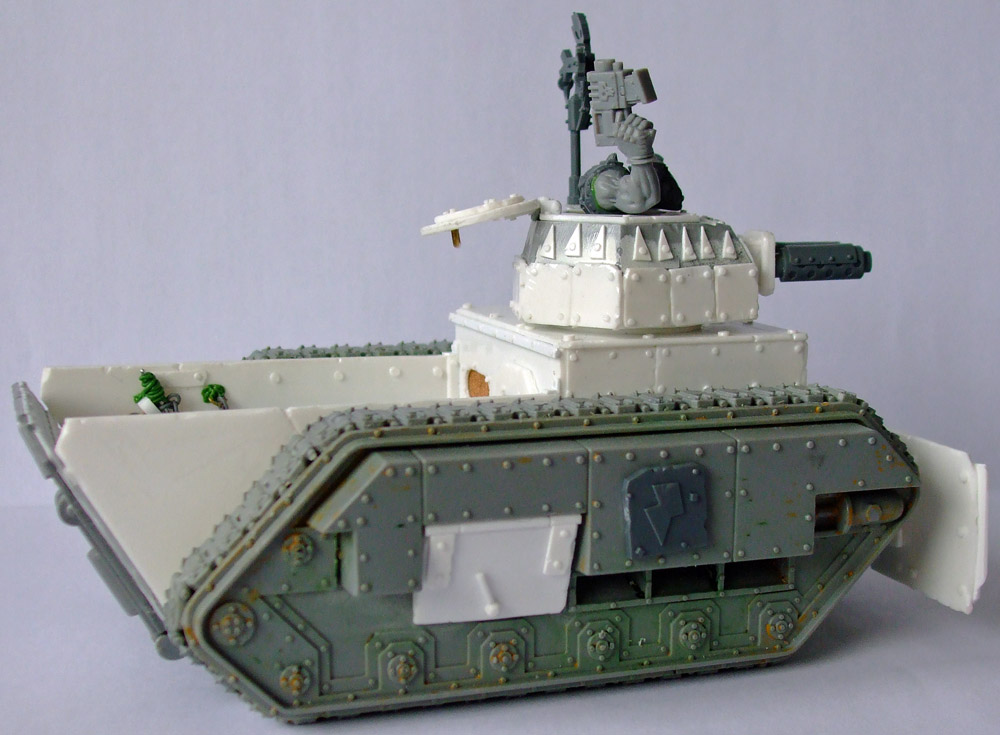
Walls, Chimeras & Gun Turrets...

I also got out tonight a Chimera and a gun turret to see how they work with the walls.

Chimera - With a regular wall unsurprising the Chimera is too big to get protection. Adding 15mm to the height gives the wall enough to protect the tank, the turret can happily fire over. As such i'm happy that the walls I go with will work as well for the Chimera as it does for a Russ.


Gun Turrets - With the additional 15mm height the turret weapon sort of sees over the wall, ideally it would be better if the wall was 1-2mm shorter. However the normal wall covers enough of the gun turret for it to claim it is in cover.


The picture below shows how much of the gun turret would be covered by the walls.


I am planning on removing the mounting plate detail on top of the wall pieces. It just doesn't come out detailed enough on the 3D prints or the casts. So the plan will probably be to make a new master which I will then cast in resin and then attach to the walls. I will probably scratch build one initially but depending how it turns out I may get it 3D printed in a more higher spec material.


I was thinking of removing the plates and doing new moulds this weekend but I'm running short on rubber, as such it'll have to wait till some more turns up.

As before let me know your thoughts and suggestions.

Defensive Walls & 3D Printing 3

Bit of a mini post this evening, well technically morning as it just went past midnight.

I mentioned in the comments to the previous post I had an alternative concept for the plinth pieces to raise the height of the walls for tanks to shelter, so today I knocked up a quick model to show the different alternatives.


Option A - The version previously seen, but developed a bit more.
Option B - The alternative I was thinking about, basically a lower plinth incorporating a firing step - so infantry still fire over the wall rather than through it.
Option C - The alternative, alternative. Basically a normal wall but taller and including a firing port. However this would mean doing a two part mould - or doing the wall in two parts. Not my favourite option (as it is also the most expensive).
Options B & C still need developing, for example the base of Option C needs to be wider - at the moment it is the same width as the normal wall.

Option A in place.

Option B in place.

Ditto for Option C
Now, the bit that will allow me to develop the ideas and make the final decision, namely what dimensions suit a Leman Russ. This is a bugger due to the weapon layout.

A Russ set up with the current 'standard' wall looks like this, as you can see it is far too small for the tank to get any protection from it.


But adding only 15mm to the height means the lascannon just sees over the wall and the heavy bolters are knackered.


Now I have this in my head I can go back and develop the ideas more, I need to decide if I want just the turret to be able to fire over or if the turret and hull weapon are what should be done, or finally if I want the sponsons to be able to fire as well.

I may have to do a new design from scratch, incorporating some of the design elements in Options A. B & C to get the final wall piece. Possibly a firing slit which the hull & sponsons can fire through and a firing step to allow infantry to use it as well.

There may be a post tomorrow with more design ideas.

Any suggestions or ideas are always welcome and appreciated.

Thursday 26 January 2012

Defensive Walls & 3D Printing 2

I've been playing around a bit more.

In the last post I mentioned rebar (i think, or I did in the comments, I can't remember now) and I spent quite a lot of time online last night trying to find someone who makes scale model rebar.

No one does.

Except in Japan.

This is annoying.

After that disapointment I spent far too much time trying to make rebar. This was not fun. In the end I got something together good enough to at least try casting it into a wall piece to see how things go. This evening I had another go at making rebar, which actually was better and didn't give me a headache in the process.

Rebar Attempt One:

The rebar wasn't great, but cast in it doesn't look bad.
I like the look of the damage.

Rebar Attempt Two:

Ironically while the rebar looked better I don't think the damage works as
well. I also think the rebar shifted in the mould so wasn't central.

After sometime casting (mainly spent waiting around, I will have to do two moulds of each piece when I start properly cranking these out) I had enough for a small setup.

Militiaman Barry for scale.


I have also been thinking about what to do with vehicles, in the sense that these walls are too low for a vehicle to have any protection. So below is the quick concept sketch I knocked up this afternoon. Basically where vehicles are going to be set up in a defensive line lower blocks (or plinths) are first fitted in place before the regular wall piece is lowered onto them. A cutout in the plinth allows troops to shelter behind it and still fire at the enemy.


The concept still needs more work but in principle I think I'll be going with it.

Monday 23 January 2012

Defensive Walls & 3D Printing

Time for an update on the defensive walls I had 3D printed - for a recap of how this started have a look at this post.

If you don't have the time to read that the models I had printed looked like this...

Corner piece on the left and straight section on the right
(which is pretty obvious so i'm not sure why I am telling you)
So the 3D prints arrived, turned out to be a quicker turn around than I expected.

I went with two different materials to see what the difference was.

The 3D Prints:

The straight section used the bog standard, run of the mill cheapest material ('White, Strong & Flexible') while for the corner piece I went with a more expensive material (Alumide) though the difference between the costs wasn't huge, but if you were doing many prints or large pieces the cost would be noticeable so it was worth investigating both materials.


There isn't a huge difference between the two pieces. The surface texture seems to be the same on both, there is no noticeable difference. However the more expensive material does have sharper detail especially on the top. The detail on the straight section is definately less defined, the straight section also has slight 'sagging' along the top face. I think as the material has cooled it fell slightly (like a cake?), it is very, very minor, maybe a .25mm and probably wouldn't be noticed if you weren't giving the pieces a good look over.

I gave the two pieces an undercoat, partly to make it easier to compare the pieces and also to help with the moulding process as the WSF isn't great for moulding due to being slightly porous, but with the undercoat I hoped this would be overcome.

Coat of Helfords grey prior to doing the moulds.

Playing with Rubber.

So some rubber was poured and after 24 hours I had a mould of the pieces and I set about making some casts.

I bought a big bag of plaster for the casting as it is a lot cheaper than resin. I was uncertain how it would deal with the detail however but at only about 15 quid for 5kg including postage it was worth investigating.

Cast One - Complete Balls Up - got the mix wrong (should of read the instructions better...)

Idiot.

Cast Two - Much better, but still not great. In hindsight I would of done the mould different as I did it with the mindframe of a resin cast.

Getting Better.

Cast Three - thought I would do a cast using resin as a comparison to the plaster versions. Detail is definately sharper. The detail on the top for example is more defined.


In hindsight I probably wouldn't of done the top detail as it is just a bit too fine for the materials used and for the casting, the plaster especially struggles with it.

Moving forward I will be doing some more casts in plaster to try different things out, such as different water/powder mixes.

I think I will order some more casts as well to try out more materials. Basically the money from the Looted Wagons I sold are being put into this with the aim of getting things right before doing anything bigger or more ambitious.

The surface texture issue is fine on these as they are meant to be concrete so the rough surface works. For other things, such as tank pieces or detail pieces I will need something better - hence needing more material experiments.

Expect an update sometime in the near future...

...btw, i've not done anything with the backpack yet so don't ask...

Sunday 22 January 2012

Looted Wagons 12

Here is the final post on the Looted Wagons (because I don't know about you but i'm getting tired of seeing Looted Wagons...).

I got some better pictures of them this morning in (sort of) daylight.

Looted Wagon 1:


Looted Wagon 2:


For those who are interested they are both now on eBay.