Pages

Wednesday 29 June 2011

Battlefleet Gothic 7

Not a huge amount in this post, more words than pictures I am afraid.

However I did paint one more Chaos Cruiser, the last of the ‘chaos’ cruisers in fact as the last Cruiser in the fleet is of course the Fallen Imperial Navy (which in fairness so are the other ones, their fall was just a bit earlier than this one).


Also re-did the crusty growths on the first cruiser as I didn’t like the original look.

Still not happy with it...

Left to right - Retaliator Grand Cruiser, Hades Heavy Cruiser,
Slaughter, Carnage & Devastation Cruisers.
Not decided on the scheme for the Fallen Navy ship yet. I think that may be the part I hate most about painting, just deciding on what scheme or colours to actually use.

Escorts are now all stripped of paint. I have replaced the front weapon on the Idolators with a plastic one as I’m not a fan of the original. Tomorrow night I will start adding the Nurgle touches to the escorts, hopefully it will be a quick job to do them. Friday should see them undercoated and a far way into getting painted. However I am not a big fan of the Idolators, I may end up trying to convert them somehow.

The Chaos Fleet all together
I did have some more ships arrive from eBay today, a nice group of transport ships. These will get a pretty neutral scheme and will be used in both the Chaos and Navy fleets.


To finish off here is the first draft of the fleet list, it isn’t a nice round number but then I do not think I will ever be able to use the full fleet. I will just pick from it for each game.

Warmaster                               50
Desolator Battleship                 300
  + Mark of Nurgle                   35

Retaliator Grand Cruiser          275
Hades Heavy Cruiser               200
Slaughter Class Cruiser            165
Devastation Class Cruiser        190
Carnage Class Cruiser             180
Lunar Class Cruiser                 180
  + Nova Cannon                     20

Idolator Escorts (5)                 225
Iconoclast Escorts (5)             150
Cobra Escorts (3)                   90
Infidel Escort (1)                     40 not in picture above*

Total                                        2100

* Not sure what to do with that single Infidel. Obviously I can’t use it by itself, so either I’ll stick it in a mixed squadron or just use it as a stand in for something else.

Must admit I could get carried away quite easily and keep adding to the fleet. The other Battleship and some of the other Cruisers are very tempting…not to mention a second ‘fallen’ Navy ship and a Marine contingent using the loyalist Marine ships for a renegade chapter which has turned to Nurgle…

Monday 27 June 2011

Realm of Battle Gaming Board 1

As I haven't done enough to do an update on the BFG fleets (too hot, too tired...) here is another catch up post on a project I will be picking back up on soon.

Way back in August 2010 I started working on a GW Realm of Battle gaming board plus the extension panels.

Naturally I couldn't resist changing it slightly. The main thing about the board I had to change was the skull pits. I hate them. Such stupid, pointless things that had to go.

So using a combination of a dremel and various saws I cut out the pits, I also removed as many other skulls I could find knocking around though I missed a few. I admit I nearly lost a finger or two in the process, the boards turned out to be quite tough. Once the holes had been cut out, cleaned up with a knife and various sandpapers they were filled in with styrene and GS.


The plan was to replace the skull pits with ponds.

So the next step was to add rocks and sand. This was followed by some more interesting additions to give the board more character and give the ponds a bit more sinister feel.

Water canteens...seemingly abandoned in the process of being filled.

A head. Not much I can add to that.

And a floating body...
Once the ponds were detailed all of the boards got sand added. This was mainly to make it much easier for me to make additional terrain for the board. Trying to match the texture of the boards on new terrain would of been a bitch to do.


The boards were sprayed black, couple of coats to get everything - not trickly with all that sand.

Pretty simple scheme, browns for the earth and greys for the rocks...Washes were used on the rocks and in the ponds some green wash was used as well.


Detail on the ponds:


I need to touch up his helmet. Do your own joke.
The ponds need water effect to be added. Unfortunately due to the weather at the time I couldn't add it. Since then I have not had the time (or room) to add it.

To bring more colour to the panels some foliage was added.


At the same time as doing the RoB panels I also knocked out some of the GW hills, two modular and one stand alone one. I used the dremel again to remove skulls and also to modify the one set of modular hills so some details between the two were slightly different (not that you would really notice, but I would know...).

The standalone hill, before the foliage was added.


'In the Near Future'

I have some holiday time coming up from work so the plans for the board are...

1. Add water effects to the ponds.
2. Paint the trees (will post WIP pictures soon)
3. Do the second board...

Yes, a second board. I picked up a complete set off ebay at the end of last year for about half price. Amazingly found someone selling one on eBay that lived less than ten minutes away thus avoiding the large postal cost.

So my plans are to heavily convert this second set.

First off the two flat panels will be turned into a river, done in the same way as the ponds above. One of the hill panels will become a waterfall, if I can get it to work, to join up with the river panels.

Another one or maybe two hill panels will be converted into a base entrance based on the FW RoB panel they had on sale at GD 2010 (but not seen of since).

The remaining panel I am undecided about at the moment. It may just be painted as a standard hill to give me more set up options.

Sunday 26 June 2011

Battlefleet Gothic 6

It's late (well very early) but what the hell i'll do an update...

Last Chaos Cruiser:


That one will get painted tomorrow (almost certainly).

'Fallen' Imperial Navy Cruiser:


Not sure how I will paint that one yet. Will paint it in an Imperial scheme which has become currupted in some way.

And now the WIP Battleship.

Mr Dremel was called into service to remove the last of the glue and also some metal to help everything fit together. I also drilled some holes to allow me to pin the three largest pieces together.

The bits then got glued together and a few gaps GS'd. I then moved onto adding the first replacement bit, underneath the rear of the hull, and began the GS Nurgleification process.


Tomorrow will have a crack at knocking the other replacement pieces out.


Lastly one final picture as I got a few pics of the painted cruisers in daylight and thought I would put one up in case it looks better than the previous ones.

Saturday 25 June 2011

Battlefleet Gothic 5

The Plague Fleet grows...


I did the 'growth' on the top of these ships differently than I did the first one, this is for two reasons really:
1. I was not that happy with how the first one turned out.
2. I couldn't remember how I did the first ship.

I am pretty sure I will come back to these and touch them up here and there. But only once all the others have been done, that way it'll help tie them all together if the details and final touches match. The growth on top will probably change once I decide how I actually want it to look.

I do need to buy some new paints. I reckon half of my GW ones are knackered and will have to be chucked.

That will be for tomorrow though. I will also do the battleship rebuild, I couldn't be bothered tonight as it involves getting the dremel out to get rid of the final bits of glue and remove some metal so it fits together better.

Thursday 23 June 2011

Battlefleet Gothic 4

Well I picked up a Chaos Fleet off eBay. The aim was to get a Battleship and plenty of escorts for my Plague Fleet. The four cruisers would be used for parts or go back on eBay.

Unfortunately the ships were crap, even at the cut down price. Not clear in the dark pictures or mentioned in the auction text was how many parts were missing from the Battleship or how poorly the ships had been put together.

So...two days after they arrived I have finally got the battleship stripped of paint and a ton of glue and four escorts stripped.


The battleship has the following bits missing:
The command bridge,
The rear side 'wings',
The 'fin' underneath the hull,
Two gun turrets.

Tomorrow I will aim to get the other escorts stripped and start re-building the battleship.

Amongst the escorts was one ship I did not recognise. I cannot find it amongst the ships on sale on the GW website and I haven't spotted anything like it in the rulebooks...


Anyone got an idea of what it is?

EDIT - Scratch that, found pics of it on Google. Damn GW site pics are so bad you can barely tell what is what.

Today I also had four Cobras turn up. Not sure yet if these will be in the Imperial Navy fleet or join the Chaos force escorting the 'fallen' Imperial Cruiser.


If all goes well on the rebuild tomorrow I will put up another update up, if it doesn't I won't...

Wednesday 22 June 2011

Poisoned Chalice - 5

Welcome to what should be the final part of Poisoned Chalice…be warned, but text and picture heavy…

At the end of Part 4 the board panels including the excavation pit and cliff had been painted, in this section we move away from the board itself to show the bits and pieces I built and/or painted which gave the board more character and added that detail that hopefully set it apart from a regular gaming board.

The Engineering Vehicles:

Hades drill.

The excavation pit has the entrance to the mine shaft going down to what the Rogue Trader team assumed to be the command deck of the Necron ship. The shaft itself was dug by a Hades drill (the dimensions I cut in the foam match the drill head). For the game the Hades would be set up away from the pit itself. It has served its purpose and now sits out of the way. As there is already a post dedicated to the Hades on Recalcitrant Daze I’ll just show a couple of pics – click the Hades tag for its own dedicated post.


Dumpy.

As I was cutting the shaft out of the foam and planning out the rubble pile I had already decided I needed something to show how they got the rubble and dirt the Hades produced out of the hole. With some track, styrene and a cut up sentinel I came up with Dumpy.


The thought was that Dumpy followed behind the Hades and rubble/dirt fell off the Hades conveyor belt into Dumpy’s bucket, it then reversed out the hole and dumped its load…I admit it isn’t the best engineering solution to the problem, but it served the purpose as a bit of scatter terrain. The main problem I faced was that the conveyor on the Hades is so low, hence the mini conveyor unit on the front of Dumpy. The idea was this could be unhooked from the bucket allowing it to be raised and the load would come out of the unlocked door at the front.


Scheme wise it was given the same scheme as the Hades (in fact Dumpy was painted before the Hades); namely in a battered yellow. I didn’t want to cover it or the other vehicles in mud and rust. These vehicles are hard working but well maintained. The users keep them in good working order and no doubt they would have got a new lick of paint once they had finished this job and been returned to the Rogue Traders vessel. A tarp was added to partially cover the cabin, as I wanted to show the inside of the cab a bit (didn’t want to waste the time I had used painting it) I modelled the tarp as though it had only been half heartedly thrown on the vehicle. I guess the operator knew it wasn’t needed anymore and he couldn’t be bothered taking the time (maybe the kettle was on the boil?). The tarp helped tie the vehicle in with some of the other pieces below.


If enough people are interested I may do a blog entry regarding Dumpy in the future, showing the rest of the WIP and painted pictures.


Sentinel Lifter & Dozer Blade

Another general utility vehicle I wanted was a Sentinel Power Lifter. I had the kit knocking around for some time, as an eBay buy it wasn’t too bad but I had to do some repair work and replace some of the pieces in brass rod.

I wanted to keep my Sentinel Lifter for my militia and thankfully someone on AB donated a used Sentinel for me to use on the board. This got stripped, pulled apart and modified. Some tube was fitted allowing the lifter unit to be removable; a large searchlight was added to the front (I only realised later that the lifter unit would block the light most of the time…). The biggest change was to knock up a rough cabin which was then covered in a tarp. Along with the Hades and Dumpy at the time of the game setting the Sentinel is standing out of the way and not in use. The tarp keeps the cabin dry and clean for the next time. I also built a new counterweight allowing me to glue it in place and gave it the same worn yellow scheme as the rest of the Sentinel.


The Sentinel was added to a quick and simple CD base. Alongside it was the dozer blade used by an Atlas as and when needed (such as shifting rubble and so on). The Atlas used on the board was provided by someone else and did not have a dozer fitted, hence adding this dozer blade alongside the Sentinel. To tie in with the sentinel a tarp was thrown over it, weighed down by a few chunks of rubble.


Scatter Terrain.

Stores:

In addition to the engineering vehicles I added another piece of scatter terrain in the shape of a store dump. Another CD provided the base on which I added anything I could get my hands on, bits of scale model stowage, barrels, GW bits and so on. Basically anything I didn’t want to keep I threw on there including some very poor 1/35 scale stowage I had bought and thought I would never use as the quality was so low.


The quality of the pieces used to bulk out the stores wasn’t important as the whole lot got a big tarp thrown over it, indeed as you can see in the picture much of the stores bulk was made up of foamboard off cuts. I just needed the pieces so that enough shape was discernable through the tarp. The tarp was added so that some details came through and a few pieces were added after it (such as the tools, chain etc).


As you have probably realised all of the tarps were painted in the same way. It helps tie all the scatter pieces together. The worn yellow scheme of the vehicles and the blue tarps, as well as the recurring details throughout (such as the pieces of wood appearing in the rubble pile along with a bucket matching the one in the excavation pit and so on which helps the whole board come together as a unified piece. That was what I was aiming for anyway so I hope it came across to everyone who saw the board set up.


Washing Station:

The washing station was built by someone else, as by this point I had finished the boards and painted all the pieces I had made I didn’t have much more to do, so I took a few pieces and painted them up allowing the other person to concentrate on producing more trees and finish other items for the Rogue Traders encampment. I painted the base to match the concrete slab I did in the excavation pit.


Lights:

Again these light were originally built by someone else. However, I couldn’t resist pulling them apart and rebuilding them. I changed the upright pole so that it looked like the lights could be raised in height with a handle on the side. I didn’t do much to them just tarted them up a bit.


Painting wise I went with a white colour, heavily battered and dirty. They will have been set up all round the excavation areas as work was being carried out so I can see them being covered in crap during the work.


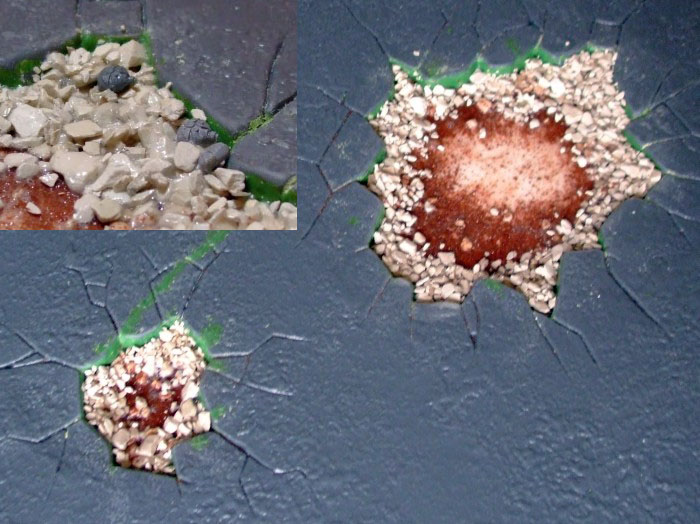
Excavation Pit Pieces & Mini Light.

The excavation pit looks quite boring as is so I knocked up some detail pieces to add in there and make it much more interesting.

So into the pit was to go:
Spare planking,
Crates,
Barrel (plus two other barrels which went in the flooded shaft),
Torch (really pleased how that turned out, weird how some of the simplest and smallest conversions can be the most enjoyable),
Coils of wire,
Bucket,
Pumping unit,
Water recycling unit (which connects to the pumping unit)

There was also a small light unit which would go by the area of excavated wing. The initial piece was built by someone else (alongside the larger lights above), however I decided to keep the Guard searchlight at the top only, rebuilding everything below it. I also added a power source using a Guard Lascannon power pack.


And the whole lot painted:


The pump and water recycling unit where built in separate pieces but painted together. The long pipe went down into the shaft while the pump and water recycling unit sat on the concrete slab in the pit. Rather than having a pumping unit set up which then dumped water onto the ground it pumps the water into the unit next to is which purifies the water allowing it to be used for drinking.


I think that just about covers the Poisoned Chalice board. Of course it only really came to life at Games Day 2010 once the pieces I built were added to the RoB panels, all the trees and Rogue Trader encampment plus the rocks I knocked up last minute and the great Kill Teams people built to fight over it.

Here are some pics taken from the day…


And now there is just one picture left to show, basically what Poisoned Chalice now looks like…


It’s a shame I suppose to see something I put so much time and effort into pulled apart, but I could never use the panels outside of GD so it was just sitting there sulking about life. The materials will get recycled in the future and I now no longer have the problem of storing a piece of terrain that was 620x600x500 or so mm in size.

Turned out to be a bit of a marathon getting through all of that lot. Next update will be much more short and sweet.